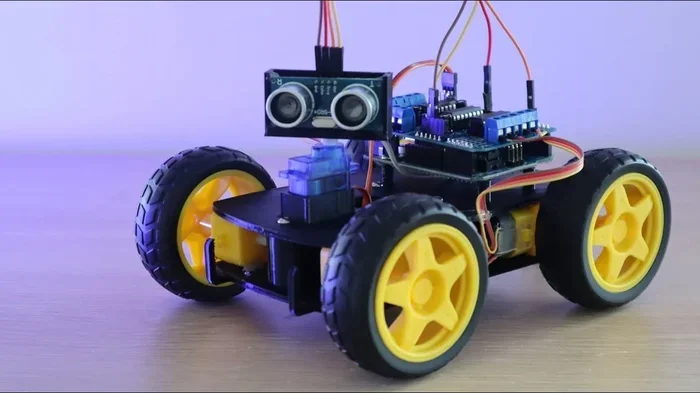
Arduino Robot Car Kit The Best DIY Project For Beginners
An Arduino robot car kit is the perfect DIY project for anyone just starting with electronics and robotics. These kits give you everything you need to build a working smart car from scratch, including the Arduino board, sensors, motors, and a chassis. Whether you are a hobbyist, a student, or a curious maker, building an Arduino robot car teaches real-world skills in coding, wiring, and engineering. In this guide, we walk you through the best kits, how to assemble them, and tips to avoid common mistakes. By the end, you will feel confident enough to start your very own robot car project at home.
If you have ever wanted to build a real working robot from scratch, an Arduino robot car kit is the best place to start. These kits are designed specifically for people who are new to electronics and programming. They come with all the parts you need, clear instructions, and a learning curve that feels manageable. You do not need to be an engineer or a tech expert to succeed. In fact, many kids and teens build their first robot car using these kits and fall in love with robotics in the process.
The beauty of an Arduino robot car kit is that it teaches you practical skills. You learn how to wire components, write code that controls motors, and use sensors to make decisions. These are the same skills used in real robotics and engineering careers. Plus, the satisfaction of watching your own creation move across a table is unbeatable. In this article, we will cover everything you need to know about choosing, building, and programming your very own Arduino robot car.
Key Takeaways
- Arduino robot car kits are ideal starter projects: They combine coding, electronics, and mechanical assembly in one fun build.
- Most kits include everything you need: Arduino board, motor driver, sensors, chassis, wheels, and cables come in the box.
- You do not need advanced skills: Basic knowledge of wiring and a willingness to learn are all it takes to get started.
- Line follower and obstacle avoidance are popular features: These smart capabilities make your robot car truly autonomous.
- Avoid common wiring and coding mistakes: Simple errors like reversed polarity or wrong sensor placement can cause big problems.
- Upgrades keep the project growing: Add Bluetooth, cameras, or voice control to take your robot car to the next level.
- Building a robot car builds real STEM skills: It teaches programming, problem-solving, and hands-on electronics in a fun way.
📑 Table of Contents
- What Is an Arduino Robot Car Kit?
- Why Arduino Robot Car Kits Are Perfect for Beginners
- What’s Inside a Typical Arduino Robot Car Kit?
- How to Build Your First Arduino Robot Car
- Best Arduino Robot Car Kits for Beginners
- Common Mistakes to Avoid When Building Your Arduino Robot Car
- Expert Tips for a Successful Arduino Robot Car Build
- The Skills You Will Gain From Building an Arduino Robot Car
- Where to Buy the Best Arduino Robot Car Kits
- Conclusion
What Is an Arduino Robot Car Kit?
An Arduino robot car kit is a collection of electronic parts and components that let you build a small, programmable vehicle. The heart of the kit is the Arduino board, which acts as the brain of your robot. It reads inputs from sensors and sends signals to motors so the car can move, turn, and avoid obstacles.
Most kits also include a chassis, which is the frame that holds everything together. You will find wheels, motors, a motor driver module, wires, and various sensors. Some kits even come with a battery holder and rechargeable batteries. Everything is designed to work together, so you do not have to hunt for compatible parts on your own.
The term DIY robot car is often used interchangeably with Arduino robot car kit. The idea is simple: you assemble the hardware, write the code, and watch your creation come to life. It is one of the most popular beginner robotics projects because it is hands-on, visual, and genuinely fun.
Why Arduino Is the Perfect Platform for Robot Cars
Arduino is an open-source electronics platform that has been around for over 20 years. It was designed to make electronics accessible to artists, designers, and beginners. The Arduino programming language is based on C++, but it is simplified enough that newcomers can learn it quickly.
There is a massive community of Arduino users online. This means you can find thousands of tutorials, example codes, and troubleshooting guides for free. If you run into a problem, someone has likely already solved it. That support network is a huge advantage when you are starting out with robot car building.
Why Arduino Robot Car Kits Are Perfect for Beginners
Starting a new hobby can feel overwhelming. There are so many components, wires, and concepts to learn. An Arduino robot car kit solves this problem by giving you a clear starting point. Everything is curated and tested to work together. You do not need to worry about compatibility or sourcing individual parts.
Easy to Learn and Build
Most Arduino robot car kits come with step-by-step instructions. The assembly process is straightforward and usually takes one to two hours. You snap or screw parts onto the chassis, connect wires to the correct ports, and upload a pre-written code to get started. This hands-on approach helps you understand how each part works before you customize it.
The programming side is also beginner-friendly. Many kits include sample codes for basic movements like forward, backward, left, and right. Once you get comfortable, you can modify the code to add new behaviors. This gradual learning curve keeps things exciting without being frustrating.
Affordable Entry into Robotics
One of the biggest advantages of an Arduino robot car kit is the price. Most quality kits cost between $30 and $80. Compare that to buying individual components separately, which can easily exceed $150. The kit also saves you time and guesswork. You get a complete robot car building experience without the hassle of finding matching parts.
For parents looking for educational gifts, these kits are outstanding. They introduce children to STEM concepts in a playful and engaging way. Kids learn problem-solving, logical thinking, and basic engineering while having a blast. It is a far better use of time than passive screen activities.
What’s Inside a Typical Arduino Robot Car Kit?
Understanding what comes in the box helps you appreciate what you are building. Let us break down the main components of a standard robot car kit.
The Arduino Board
The Arduino Uno is the most common board included in beginner kits. It has 14 digital input/output pins, 6 analog inputs, and a USB connection for programming. The board processes all the sensor data and sends commands to the motors. Think of it as the central processing unit of your DIY robot car.
If you upgrade later, you can use an Arduino Mega or Nano. These boards offer more pins and processing power for advanced projects. But for your first build, the Uno is perfect and more than capable.
Sensors and Modules
Sensors are what make your robot car smart. The most common sensors in beginner kits include:
- Ultrasonic sensor: Measures distance by sending sound waves. It helps your car detect walls and objects, enabling obstacle avoidance.
- Infrared line sensor: Detects dark lines on a light surface. This is essential for building a line follower robot that tracks a path on the floor.
- IR remote receiver: Lets you control the car with a remote control. Great for beginners who want manual control first.
- Bluetooth module: Allows you to control the car using a smartphone app. This is a popular upgrade for smart car kit projects.
Chassis, Motors, and Wheels
The chassis is the skeleton of your robot car. Most kits use acrylic or metal frames that are lightweight yet sturdy. The frame holds the Arduino board, motor driver, sensors, and battery pack in place.
DC motors are the most common choice for Arduino robot car projects. They are simple, reliable, and provide enough power to move the car smoothly. Wheels are typically made of rubber or plastic and attach directly to the motor shafts. Some kits include caster wheels for better balance and turning.
The Motor Driver Module
The motor driver is a crucial component that acts as a bridge between the Arduino and the motors. The Arduino board cannot supply enough current to power motors directly. The motor driver takes the low-power signal from the Arduino and amplifies it to drive the motors at full speed.
The L298N motor driver is the most popular choice in beginner kits. It is reliable, easy to wire, and well-documented. Learning how to connect and use a motor driver is one of the most valuable skills you gain from building an Arduino robot car.
How to Build Your First Arduino Robot Car
Building an Arduino robot car is a rewarding experience that goes step by step. You do not need to be an expert. Follow these general stages, and you will have a working robot car in no time.
Step-by-Step Assembly Guide
Every kit is slightly different, but the general process follows a similar pattern. Here is what a typical assembly looks like:
- Attach the motors to the chassis. Most kits include screws and brackets. Secure the DC motors to the rear of the chassis frame.
- Mount the wheels. Push or screw the wheels onto the motor shafts. Make sure they spin freely without wobbling.
- Install the caster wheel. This small wheel goes on the front of the chassis for balance. It allows the car to turn smoothly.
- Place the motor driver on the chassis. Use double-sided tape or screws to secure it. The motor driver connects to the motors and the Arduino board.
- Wire the motors to the motor driver. Follow the wiring diagram in your kit’s manual. Pay close attention to polarity.
- Mount the Arduino board. Use standoffs or adhesive pads to attach it to the top of the chassis.
- Connect the sensors. Mount the ultrasonic sensor on the front and line sensors on the bottom. Plug them into the correct Arduino pins.
- Attach the battery pack. Power the system with batteries or a rechargeable pack. Make sure the voltage matches your components.
- Upload the code. Connect the Arduino to your computer via USB and upload the test code. Your robot car should now respond to basic commands.
Take your time with each step. Rushing through assembly is the number one cause of wiring mistakes. If something does not work, double-check your connections before assuming a part is defective.
Programming Your Robot Car
Once the hardware is assembled, it is time to bring your robot car to life with code. The Arduino Integrated Development Environment (IDE) is the software you use to write and upload programs. It is free to download and works on Windows, Mac, and Linux.
Most kits include sample codes that you can upload right away. These codes handle basic functions like moving forward, turning, and stopping. Here is a simple example of what a basic movement function looks like:
In the Arduino code, you define which pins connect to the motor driver. Then you write functions like moveForward(), turnLeft(), and turnRight(). Each function sets the correct pins to HIGH or LOW, which tells the motor driver to spin the motors in a specific direction.
As you gain confidence, you can write your own custom code. Try combining the ultrasonic sensor with motor control to create an obstacle avoidance program. When the sensor detects an object within 20 centimeters, the car stops, reverses, and turns. This is one of the most satisfying milestones in beginner robot car programming.
Best Arduino Robot Car Kits for Beginners
Not all kits are created equal. Some are better for absolute beginners, while others offer more advanced features. Here are the most popular options on the market right now.
| Kit Name | Price Range | Key Features | Best For |
|---|---|---|---|
| Elegoo Smart Car Kit | $35-$50 | Line following, obstacle avoidance, IR remote control | Complete beginners |
| Makeblock mBot | $80-$100 | Scratch programming, metal chassis, expandable | Kids and young teens |
| Freenove Ultimate Starter Kit | $50-$70 | Multiple sensor types, detailed tutorials, large community | Self-learners |
| DFRobot Romeo V2 | $40-$60 | Built-in motor driver, Bluetooth, compact design | Compact builds |
| SunFounder Raspberry Pi Car Kit | $60-$90 | Raspberry Pi compatible, camera module support, Python | Intermediate makers |
The Elegoo Smart Car Kit stands out as the top pick for most beginners. It offers great value, comprehensive tutorials, and supports all the classic robot car features. The Makeblock mBot is an excellent choice for younger builders because it uses a visual programming language called Scratch, which removes the need to write code manually.
If you already have some Arduino experience, the Freenove kit gives you more flexibility and room to experiment. It includes a wider range of sensors and modules, which lets you explore more advanced robot car building techniques.
Common Mistakes to Avoid When Building Your Arduino Robot Car
Even with clear instructions, beginners make mistakes. The good news is that most of these errors are easy to avoid if you know what to watch for.
Mistake 1: Reversed motor polarity. This is the most common wiring error. When motors spin in the wrong direction, the car moves backward instead of forward. Simply swap the motor wires on the driver module to fix this.
Mistake 2: Incorrect sensor placement. Sensors need to be positioned correctly to work properly. For example, the ultrasonic sensor should face forward at a slight upward angle. If it sits too low, it will detect the floor instead of obstacles ahead.
Mistake 3: Using the wrong power source. Motors draw a lot of current. If you power them from the Arduino board directly, it can damage the board. Always use an external battery pack and connect it through the motor driver. This is one of the most important safety rules in Arduino robotics.
Mistake 4: Skipping the test steps. Many beginners assemble everything at once and then upload the code. If something does not work, it is hard to isolate the problem. Instead, test each component individually. Verify that the motors respond before adding sensors. Test the sensors before moving on to the next step. This modular approach saves hours of frustration.
Mistake 5: Not reading the manual. It sounds obvious, but many people skip the instruction booklet. The manual contains wiring diagrams, pin mappings, and troubleshooting tips. Reading it before you start can prevent most common issues.
Expert Tips for a Successful Arduino Robot Car Build
Here are some insider tips from experienced makers that will help you get the best results from your Arduino robot car project.
Tip 1: Use a breadboard for testing. Before soldering or permanently connecting anything, test your circuits on a breadboard. A breadboard lets you rearrange wires easily and experiment with different configurations without any permanent commitment.
Tip 2: Label your wires. As your robot car grows in complexity, wire management becomes critical. Use colored wires and label them with small tape flags. This simple habit saves enormous time when troubleshooting issues later.
Tip 3: Start with the basic code first. Do not try to build a fully autonomous car on day one. Start with manual remote control. Once you understand how the motors respond, add obstacle detection. Then add line following. Build your skills one layer at a time.
Tip 4: Join online communities. The Arduino community is incredibly supportive. Forums like Arduino Forum, Reddit’s r/arduino, and various Facebook groups are filled with people who love helping beginners. Post your questions, share your progress, and learn from others’ experiences.
Tip 5: Keep a project log. Write down what you did, what worked, and what did not work. This documentation is invaluable when you want to revisit the project or share your experience with others. It also helps you troubleshoot problems faster in the future.
Tip 6: Upgrade gradually. Your first build does not need to be perfect. Start with a basic kit and add components over time. A Bluetooth module is a great first upgrade because it lets you control the car from your phone. Next, consider adding a camera module for a first-person view experience. The possibilities are endless in the world of Arduino robotics.
The Skills You Will Gain From Building an Arduino Robot Car
Building a robot car is about much more than just assembling parts. It is a learning experience that develops a wide range of valuable skills.
Programming skills: You learn the basics of C++ programming through the Arduino IDE. You understand variables, functions, loops, and conditional statements. These concepts apply to many other programming languages and projects.
Electronics knowledge: You learn how circuits work, how to read wiring diagrams, and how components like resistors, capacitors, and transistors function. This foundation is essential for any electronics project.
Mechanical assembly: Fitting parts together, managing wires, and ensuring everything is secure teaches practical hands-on skills. These are the same skills used in manufacturing and engineering fields.
Problem-solving: When something does not work, you learn to diagnose the issue systematically. You test individual components, check connections, and review your code. This analytical thinking is useful in every area of life.
Project management: Breaking a complex build into smaller steps teaches you how to plan and execute a project. This is a transferable skill that benefits students, professionals, and hobbyists alike.
Where to Buy the Best Arduino Robot Car Kits
You can find Arduino robot car kits on many online platforms. Amazon is the most popular option because of fast shipping, customer reviews, and easy returns. Websites like RobotShop, Adafruit, and SparkFun offer curated kits with excellent documentation.
If you prefer to support local businesses, check your nearest electronics hobby store. Many stores carry popular kits and can offer personalized advice. Buying locally also means you can see the product quality before purchasing.
For the best value, look for kits that include free online tutorials and a strong user community. The Elegoo and Freenove brands are particularly well-regarded for their comprehensive documentation and responsive support teams.
Always check the return policy before buying. A good retailer will accept returns within 30 days if the kit is defective or does not meet your expectations. This gives you peace of mind when trying a new brand for the first time.
Conclusion
An Arduino robot car kit is hands down one of the best DIY projects you can start as a beginner. It combines programming, electronics, and mechanical assembly into one exciting, hands-on experience. You do not need any prior experience to succeed. All you need is curiosity, patience, and a willingness to learn.
The skills you gain from building and programming your own robot car extend far beyond the project itself. You develop a deeper understanding of how technology works, improve your problem-solving abilities, and gain confidence in your technical skills. Whether you build it for fun, for education, or as a stepping stone to more advanced robotics, the experience is incredibly rewarding.
Start with a quality kit, follow the instructions carefully, and do not be afraid to make mistakes. Every error is a learning opportunity. Soon enough, you will have a fully functional robot car that you built with your own hands. That feeling of accomplishment is what makes Arduino robotics so addictive and so worth the effort.
So grab an Arduino robot car kit today, roll up your sleeves, and dive into the wonderful world of DIY robotics. Your first smart car is just a few steps away.
Frequently Asked Questions
What is the best Arduino robot car kit for absolute beginners?
The Elegoo Smart Car Kit is widely regarded as the best option for complete beginners. It includes everything you need, comes with detailed step-by-step tutorials, and supports line following, obstacle avoidance, and remote control. The price is also very reasonable, usually between $35 and $50.
Do I need any prior programming experience to build an Arduino robot car?
No prior experience is required. Most Arduino robot car kits include pre-written sample codes that you can upload directly. As you gain confidence, you can modify the code to add new features. The Arduino programming language is designed to be beginner-friendly, and there are countless free tutorials available online.
How long does it take to build an Arduino robot car?
A typical beginner kit takes about one to three hours to assemble. The exact time depends on your experience level and the complexity of the kit. Programming and testing may take additional time, especially if you want to customize the behavior of your robot car.
Can I use an Arduino robot car kit for school projects or science fairs?
Absolutely. Arduino robot car kits are excellent for school projects and science fairs. They demonstrate core STEM concepts including programming, electronics, and mechanical engineering. Many teachers and educators use these kits in classrooms to make learning interactive and fun.
What upgrades can I add to my Arduino robot car?
There are many popular upgrades you can add. A Bluetooth module lets you control the car with a smartphone app. A camera module enables first-person view driving. You can also add a servo-mounted ultrasonic sensor for better obstacle detection, or a voice recognition module for hands-free control. The possibilities are nearly endless in the world of Arduino robotics.
Is an Arduino robot car kit safe for children?
Yes, most kits are designed with safety in mind. The voltages used are low and the components are not dangerous when handled properly. However, younger children should work under adult supervision, especially when handling small parts and batteries. Kits like the Makeblock mBot are specifically designed with younger users in mind and feature tool-free assembly.