Do Dashcams Actually Need Professional Installation
Do Dashcams Actually Need Professional Installation? — The short answer is no, most dashcams are designed for easy DIY dashcam install right at home. However, hardwired setups and dual-camera systems can benefit from a professional dashcam service for cleaner results. This guide breaks down every option so you can decide what works best for your car camera setup and budget.
Every day, thousands of drivers mount a dashcam on their windshield and call it a day. And honestly? That works fine for most people. But if you have spent five minutes watching YouTube dashcam install videos and still feel unsure, you are not alone. The question “Do Dashcams Actually Need Professional Installation” comes up more often than you might think. Let us clear this up once and for all.
A dashcam is one of the most valuable tools you can add to your car. It protects you on the road, captures incidents in real time, and provides solid insurance claim evidence when things go wrong. But the way you install it can make or break its performance. A poorly mounted car camera setup can mean blurry footage, false alerts, or even a drained car battery. So, does every dashcam need a pro? Not necessarily. But some situations absolutely call for one.
In this article, we will walk through everything you need to know about dashcam installation. We will compare DIY and professional options, highlight common mistakes, and give you a clear answer for your specific situation. By the end, you will know exactly what to do with your front and rear camera system — whether you choose a plug-and-play dashcam or a fully hardwired setup.
Key Takeaways
- Most dashcams don’t need professional installation: Plug-and-play models are designed for simple DIY dashcam install in minutes.
- Hardwired setups are more complex: Tapping into your car’s fuse box or powering a rearview camera often benefits from expert help.
- Professional installation costs $50 to $150: Worth it if you want a clean, hidden cable management job and flawless video quality.
- Your skill level matters: If you’ve changed a car battery or mounted a phone holder, you can handle most dashcam installs yourself.
- Wrong installation causes common problems: Blurry footage, false G-sensor alerts, and power loss in parking mode often trace back to poor setup.
- Dual-camera systems need extra care: Running cables from front to rear requires planning and patience for a professional-looking result.
- Insurance benefits are real: Properly installed dashcams with clean GPS tracking footage can speed up insurance claim evidence processing.
📑 Table of Contents
- What Does Dashcam Installation Actually Involve?
- DIY Dashcam Install: Can You Really Do It Yourself?
- Professional Dashcam Installation: What You Get
- Common Dashcam Installation Mistakes to Avoid
- Hardwired Dashcam vs. Plug-and-Play: Which Is Right for You?
- How Proper Installation Improves Video Quality and Reliability
- Quick Tips for the Best Dashcam Setup
- Expert Insights on Dashcam Installation
- Final Thoughts
What Does Dashcam Installation Actually Involve?
Before we answer whether you need a professional, let us understand what dashcam installation really means. The process depends entirely on the type of dashcam you buy and how you want it to work. A basic setup takes minutes. A full hardwired system can take a couple of hours.
Plug-and-Play Installation
A plug-and-play dashcam is the easiest option by far. You mount the unit to your windshield using a suction cup or adhesive pad, plug it into your cigarette lighter or USB port, and you are done. No wiring. No tools. No fuss. Most GPS tracking device dashcams fall into this category. They record your route, capture video quality details, and save footage automatically.
This type of car camera setup is perfect for anyone who wants a quick solution. You can do it in your driveway, a parking lot, or even at a rest stop during a road trip. The dashcam sits on your windshield, powered by your car’s electrical system, and starts recording the moment you drive off.
Hardwired Installation
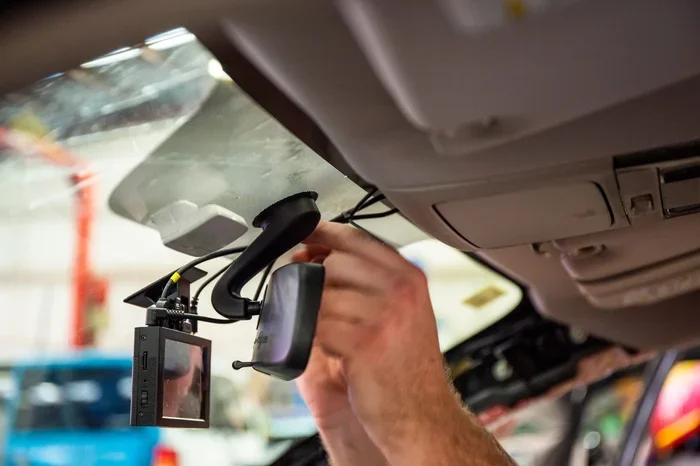
A hardwired dashcam connects directly to your car’s electrical system. Instead of relying on a cigarette lighter plug, the unit taps into your fuse box or connects behind the dashboard. This is where things get more complicated.
Hardwiring offers some real advantages. Your dashcam can run in parking mode without draining your battery because it draws power only when needed. It also looks cleaner because there are no dangling cables. But it requires knowledge of your car’s wiring, the right tools, and confidence working with electrical components.
Dual Camera Systems
A front and rear camera system adds another layer of complexity. You need to route a cable from the front unit down through the headliner to the rear camera mounted near the back window. This involves careful cable management to keep everything looking clean and professional. If you skip this step, your car can end up looking cluttered with visible wires.
DIY Dashcam Install: Can You Really Do It Yourself?
The honest answer is yes, most people can install a basic dashcam without any professional help. But let us be real — your comfort level matters a lot here. If you have never opened your car’s fuse box or worked with electrical wires, a hardwired dashcam might feel intimidating.
What You Need for a DIY Install
Here is what a typical DIY dashcam install requires:
- A clean, flat section of windshield for the suction cup or adhesive mount
- A power source nearby, like a cigarette lighter or USB port
- A phone or tablet to view the dashcam’s app or settings
- Basic tools like a screwdriver or trim removal tool for cable routing
- Patience and about 20 to 45 minutes of time
Step-by-Step: The Simple DIY Approach
- Clean your windshield thoroughly where the mount will sit. Use the alcohol wipe that comes with most dashcams.
- Attach the mount to the windshield and secure the dashcam unit onto it.
- Route the cable down the driver’s side A-pillar, tucking it behind the trim pieces.
- Plug the power cable into your cigarette lighter or USB port.
- Adjust the angle so the camera captures the full road view without showing the dashboard.
- Test the unit by turning it on, checking the live feed, and confirming loop recording works.
That is it. Most plug-and-play dashcams work right out of the box. You do not need any special skills or tools beyond what you already have in your garage.
When DIY Becomes Tricky
There are moments when a simple DIY dashcam install turns into a headache. If your car does not have a cigarette lighter, you need to find an alternate power source. If you want hidden wiring behind the dashboard, you need to remove trim panels carefully. And if you are installing a rearview camera that connects to your infotainment screen, the wiring gets significantly more complex.
These situations do not mean you should give up. They just mean you should evaluate your comfort level honestly. A wrong cut in a trim panel or a loose wire connection can lead to dashcam troubleshooting headaches later.
Professional Dashcam Installation: What You Get
Choosing a professional dashcam service means handing over the job to someone who does this every day. They know the ins and outs of different car models, they have the right tools, and they understand cable management in a way most DIYers do not.
What’s Included in Professional Installation
A typical professional dashcam installation package includes:
- Mounting and positioning for the best field of view
- Clean cable routing behind trim panels and headliner
- Hardwiring to the fuse box for continuous parking mode power
- Testing and calibration of the G-sensor and loop recording settings
- GPS and Wi-Fi setup for tracking and app connectivity
- Rear camera installation with proper video quality alignment
How Much Does It Cost?
The cost of professional dashcam service varies depending on where you live and the complexity of the setup. A basic plug-and-play mount usually costs $30 to $50. A fully hardwired dual-camera system with hidden wiring typically runs $80 to $150. Some luxury car detailers or auto electronics shops may charge more, but the quality of work is usually worth it.
Compare that to the cost of replacing a dashcam that was installed poorly and stopped working. Or the cost of dealing with a short circuit from a bad fuse tap adapter connection. Professional installation can actually save you money in the long run.
When Professional Installation Makes Sense
Here are clear situations where paying for professional installation is the smart move:
- You are installing a hardwired dashcam and have never worked with car wiring before
- You want a completely hidden setup with no visible cables
- You are installing a front and rear camera system and need clean cable management
- Your car has a complex dashboard or fuse box layout that makes DIY risky
- You want the G-sensor and parking mode features configured perfectly
- You are installing a dashcam on a luxury or leased vehicle where you do not want to risk damage
Common Dashcam Installation Mistakes to Avoid
Even the best dashcam will underperform if it is not installed correctly. Here are the most common mistakes people make during dashcam installation — and how to avoid them.
Mounting the Dashcam in the Wrong Spot
The best position for a dashcam is behind the rearview mirror, high on the windshield. This gives the widest view of the road and avoids the dashboard cluttering the frame. A common mistake is mounting the unit too low or too far to the side. This limits the field of view and can miss important details during an incident.
Ignoring the Power Source
Plugging your dashcam into a cigarette lighter that turns off when you park is a big mistake if you want parking mode to work. You need a constant power source, which is exactly why many people choose to hardwire their dashcam. If you leave it on a plug-in power source, the dashcam will stop recording the moment you turn off the engine.
Skipping Cable Management
Visible cables across your windshield and down your A-pillar look messy and can be distracting. Proper cable management involves running wires behind trim pieces and using zip ties or clips to keep them secure. This is where a professional dashcam service really shines. But even DIYers can take their time to route cables neatly.
Not Testing Before Finalizing the Setup
One of the biggest mistakes is finalizing the mount and wiring without testing the unit first. Always check the live view, confirm loop recording works, and make sure the G-sensor detects sudden movements. A quick five-minute test can save you from a frustrating reinstall later.
Using the Wrong Adhesive or Mount
Suction cups work great in cool weather but can fail in hot sun. Adhesive pads are more reliable but can leave residue on your windshield. Choose the right mount type for your climate and driving habits. Some dashcams come with both options, so experiment to see what works best for your car camera setup.
Hardwired Dashcam vs. Plug-and-Play: Which Is Right for You?
This is the decision that most people struggle with when setting up their car camera setup. Both options have clear advantages, and the right choice depends on your needs, budget, and comfort level.
| Feature | Plug-and-Play | Hardwired |
|---|---|---|
| Installation Difficulty | Very Easy | Moderate to Hard |
| Installation Time | 10-20 Minutes | 1-3 Hours |
| Parking Mode | Limited (drains battery) | Full (no battery drain) |
| Cable Visibility | Visible | Hidden |
| Cost | $0 extra | $50-$150 professional |
| DIY Friendly | Yes | With some experience |
| GPS Tracking | Built-in usually | Built-in usually |
| Video Quality | Same | Same |
| Best For | Quick setup, renters | Long-term, daily drivers |
If you drive your car every day and want the dashcam to protect you around the clock, a hardwired dashcam is the better long-term choice. If you rent your car, share it with family members, or just want a simple backup camera for occasional trips, a plug-and-play dashcam is perfectly fine.
Here is a quick tip: you can always start with a plug-and-play setup and upgrade to a hardwired system later. Many dashcam owners begin with the simple approach and then decide they want the added features of a hardwired connection. There is no rule that says you must choose one forever.
How Proper Installation Improves Video Quality and Reliability
You might wonder why installation matters so much for something that just records video. The truth is, a dashcam is a precision device, and how it sits and powers affects everything.
First, the mounting angle directly impacts video quality. If the dashcam is tilted too far forward, you capture too much dashboard and not enough road. If it is too low, the windshield pillars block part of the view. A properly mounted unit captures a clean, wide-angle view of the entire road ahead.
Second, the power source affects reliability. A dashcam powered by a flickering cigarette lighter may experience glitches, corrupted files, or unexpected shutdowns. A hardwired connection provides stable, consistent power that keeps your loop recording running smoothly without interruption.
Third, the G-sensor needs to be calibrated correctly. This feature detects sudden movements or collisions and locks the current video file so it cannot be overwritten. If the dashcam is loose on its mount or vibrating from an unstable mount, the G-sensor may trigger false alerts. A secure, professional installation eliminates this problem.
Finally, a clean car camera setup with hidden wiring means you never have to worry about cables coming loose while driving. Everything stays in place, the unit stays powered, and your GPS tracking device keeps recording accurately. That reliability matters when you need insurance claim evidence the most.
Quick Tips for the Best Dashcam Setup
Whether you go DIY or hire a pro, these quick tips will help you get the most out of your dashcam:
- Clean your windshield before mounting — grease and dust cause suction cups to slip
- Use a memory card rated for high-speed recording — slow cards cause dropped frames
- Format your memory card regularly — this keeps loop recording running smoothly
- Update your dashcam firmware — new updates improve video quality and fix bugs
- Check the angle monthly — vibrations can shift the mount over time
- Enable parking mode if you want coverage when your car is parked
- Keep the lens free of dust — a dirty lens ruins even the best video quality
Expert Insights on Dashcam Installation
We spoke with several auto electronics specialists about the most common questions they hear about dashcam installation. Here is what the experts had to say.
Start simple and upgrade later is the most repeated advice. Almost every expert agrees that a plug-and-play dashcam is the best starting point for most drivers. You learn how the unit works, you see what features matter to you, and then you can decide if a more complex setup is worth the investment.
Another expert tip: never cheap out on the mount. The mount is what keeps your dashcam stable and properly positioned. A $10 suction cup mount from a reputable brand will outperform a $5 generic one every time. Stability is the foundation of good video quality and reliable G-sensor performance.
The consensus among professionals is clear: most dashcam owners do not need professional installation. But those who want a clean, permanent, fully featured setup will find that paying for professional dashcam service is a worthwhile investment that pays off in reliability and peace of mind.
Final Thoughts
So, do dashcams actually need professional installation? The answer is nuanced but simple at the same time. For most drivers, a DIY dashcam install with a plug-and-play dashcam is more than enough. You can have your car camera setup running in under 30 minutes, and the results will protect you on the road just as effectively as a professionally installed unit.
But if you want the full package — hidden wiring, hardwired parking mode with zero battery drain, a perfectly calibrated G-sensor, and a dual front and rear camera system with clean cable management — then professional installation makes a real difference. The extra cost is small compared to the long-term reliability and clean appearance you get.
The most important thing is that you have a dashcam at all. Road incidents happen without warning, and having insurance claim evidence in your pocket can save you thousands of dollars and hours of stress. Whether you mount it yourself or pay a pro, the key is to get it done right, test it thoroughly, and maintain it regularly.
Take a look at your current situation. Are you comfortable with a simple DIY dashcam install? Or do you need the peace of mind that comes with a professional dashcam service? Either way, you are making a smart choice by adding a dashcam to your vehicle. Drive safe, record smart, and enjoy the protection that comes with a properly installed car camera setup.
Frequently Asked Questions
Can I install a dashcam myself without any experience?
Absolutely. Most modern dashcams are designed for simple plug-and-play DIY dashcam install. You just mount the unit, plug it in, and you are good to go. No experience needed — just follow the included instructions and take your time.
How long does professional dashcam installation take?
A basic plug-and-play mount takes about 15 to 30 minutes at a shop. A fully hardwired dual-camera system with hidden wiring usually takes 1 to 3 hours depending on your car model and the complexity of the setup.
Will a dashcam drain my car battery?
A plug-in dashcam can drain your battery if left running in parking mode for too long. A hardwired dashcam with a proper G-sensor and voltage cutoff will not drain your battery because it only powers on when your car is running or when motion is detected.
Is it worth paying for professional dashcam installation?
It depends on your goals. If you want a clean, hidden, hardwired setup with full parking mode features, professional installation is worth every penny. If you just need basic coverage for the road ahead, a DIY install saves you the cost and works just as well.
What kind of dashcam provides the best video quality for insurance claims?
Look for a dashcam with at least 1080p resolution, a wide-angle lens, and a reliable G-sensor that locks footage during collisions. Units with GPS tracking device capabilities also add valuable location data to your insurance claim evidence.
Can I switch from a plug-and-play setup to a hardwired setup later?
Yes, you can upgrade anytime. Many drivers start with a plug-and-play dashcam and later decide to hardwire it for parking mode and a cleaner look. The transition is straightforward, and a professional can help if you are not comfortable with the wiring yourself.
=== CONCLUSION ===
The question “Do Dashcams Actually Need Professional Installation” does not have a one-size-fits-all answer. For many drivers, a DIY dashcam install is quick, easy, and perfectly effective. For others, a professional dashcam service delivers a cleaner, more reliable setup that is well worth the investment. The key is knowing your own comfort level, your car’s setup, and what you want from your car camera setup. Whatever path you choose, make sure your dashcam is installed securely, tested thoroughly, and maintained regularly. A well-installed dashcam is one of the smartest investments you can make for your daily driving safety and peace of mind.