How to Change the Air Filter on a Honda Civic Step by Step
Changing the air filter on your Honda Civic is one of the easiest maintenance tasks you can do at home. This guide walks you through replacing both the engine air filter and the cabin air filter in just minutes. You will save money, improve fuel efficiency, and keep your Honda Civic running at its best without visiting a mechanic.
Your Honda Civic is a reliable, efficient machine. But did you know that something as simple as a dirty air filter can silently hurt its performance? The air filter is one of the most overlooked parts of car maintenance. Yet it plays a huge role in how well your engine breathes, how much fuel you use, and how long your engine lasts.
Whether you are a complete beginner or a seasoned DIYer, learning how to change the air filter on a Honda Civic is a skill worth having. It takes just a few minutes, costs very little, and requires no special tools. In this guide, we will walk you through every single step. You will learn how to replace both the engine air filter and the cabin air filter. We will also cover how often to do it, what mistakes to avoid, and how to pick the right replacement part.
The good news is that this job is so simple, you will wonder why you ever paid a mechanic to do it. By the end of this article, you will feel confident tackling the Honda Civic air filter replacement on your own. Let us get started.
Key Takeaways
- Easy DIY Job: You can change the air filter on a Honda Civic in under 15 minutes with basic tools.
- Two Types of Filters: The engine air filter and cabin air filter both need regular replacement for optimal performance.
- Saves Money: DIY replacement costs a fraction of what a shop charges.
- Improves Performance: A clean filter boosts airflow, fuel economy, and engine power.
- Know the Signs: Knowing when to replace your filter prevents engine damage and keeps your car running smoothly.
- Common Mistakes Exist: Avoiding simple errors like wrong filter orientation or skipping the gasket check keeps your Honda running right.
📑 Table of Contents
- Why Changing the Air Filter on Your Honda Civic Matters
- Tools and Parts You Need Before You Start
- Step-by-Step: How to Change the Engine Air Filter
- Step-by-Step: How to Change the Cabin Air Filter
- How Often Should You Replace Your Honda Civic Air Filter?
- Common Mistakes to Avoid When Changing Your Air Filter
- Quick Tips for a Better Air Filter Change
- Benefits of DIY Air Filter Replacement
- Conclusion
Why Changing the Air Filter on Your Honda Civic Matters
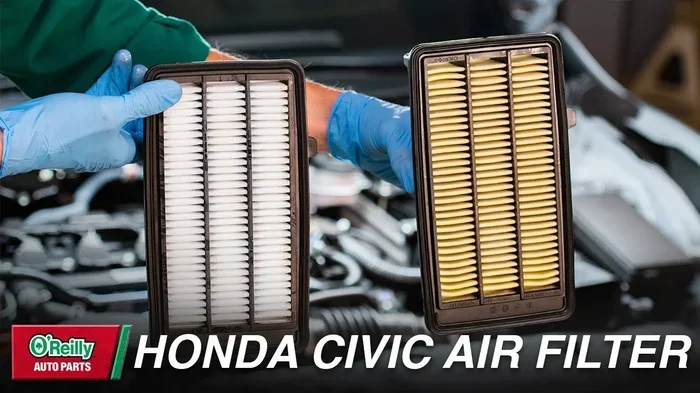
The engine air filter catches dust, dirt, pollen, and debris before they enter your engine. Think of it like a net that traps unwanted particles. Over time, that net fills up. When it does, airflow gets restricted. And when airflow is restricted, your engine suffers.
A dirty air filter element can cause several problems. You might notice reduced fuel efficiency. Your engine might feel sluggish or lose power. In worse cases, a clogged filter can cause rough idling or even engine damage over time. The cabin air filter works similarly but for your interior. It cleans the air that comes through your vents. A dirty cabin filter means less clean air inside your car.
Replacing your filters regularly is one of the cheapest ways to protect your Honda Civic. It is also one of the easiest maintenance tasks you can do. A clean air filter helps your engine breathe easy, improves fuel efficiency, and keeps your car running smoothly for years.
How a Dirty Filter Affects Performance
When the air filter housing gets clogged with dirt and debris, your engine has to work harder to pull in air. This creates a flow restriction that reduces the air-fuel ratio. Your engine then burns fuel less efficiently. You might notice a slight drop in acceleration or a rough feel when idling.
Some drivers say their car feels “sluggish” or “not right” but cannot figure out why. Often, the answer is a dirty air filter replacement is overdue. Replacing it can feel like unlocking lost power. Many people report a noticeable difference in how their car drives right after a fresh filter goes in.
Tools and Parts You Need Before You Start
One of the best things about this job is how little you need. You do not need expensive tools or special skills. Here is everything you should have ready before you begin the Honda Civic air filter change.
Tools You Will Need
- Flathead screwdriver or trim removal tool
- Phillips head screwdriver (for some models)
- Clean cloth or rag to wipe down the area
- Flashlight (optional but helpful)
Parts You Will Need
- OEM engine air filter (Honda part number for your Civic model year)
- OEM cabin air filter (if your model has one)
- Air filter gasket (check if yours needs replacing too)
You can find the right air filter size by checking your owner’s manual or looking up your specific Honda Civic model year. The part is usually very affordable, often between $10 and $25 for the engine filter. Aftermarket air filter options are also available, but OEM filters are a safe and reliable choice for most drivers.
Where to Find Your Air Filter Parts
You can buy air filter replacement parts at most auto parts stores or online. Popular brands include ACDelco, Fram, and Mann. If you want the exact factory part, check with your Honda dealer. Make sure the filter matches your specific Civic model year and engine type. The air filter orientation matters too, so pay attention to how the old filter sits before removing it.
Step-by-Step: How to Change the Engine Air Filter
The engine air filter is the most common one people think of when they hear “air filter.” It sits inside the air box near the top of your engine. Replacing it is quick and straightforward. Follow these steps carefully for the best results.
Step 1: Locate the Air Filter Housing
Open your hood and look for a large rectangular box near the top of the engine. This is the air filter housing. On most Honda Civic models, it sits on top of or to the side of the engine. You will see a large intake tube connected to it. The box is held together with clips or screws.
Use your flashlight if you need help finding it. The housing is usually easy to spot because it is the biggest plastic box in the engine bay. On older Honda Civic models, the housing might be slightly different in shape, but the basic process is the same.
Step 2: Open the Air Filter Housing
Most Honda Civic air filter housings use metal clips or thumb screws. Press the clips inward or loosen the screws to release the top half of the housing. Gently lift the cover off. Be careful not to break any clips. If the clips feel stiff, wiggle the cover gently side to side until it releases.
Once the cover is off, you will see the air filter element sitting inside. Take a moment to notice how the old filter sits. Pay attention to its direction and orientation. This will help you install the new one correctly.
Step 3: Remove the Old Filter
Carefully lift the old filter out of the housing. It will likely be covered in dust and debris. Hold it over a trash can or work surface to avoid making a mess. Do not shake it too hard, as this can spread dirt into the engine bay.
Take a close look at the old filter. If it looks dark gray or black and feels gritty, it is definitely time for a change. A clean filter should be a light tan or off-white color. The condition of your old filter gives you a good idea of how much debris has been entering your engine.
Step 4: Clean the Air Filter Housing
Use your clean cloth to wipe out the inside of the air box. Remove any loose dirt, leaves, or debris. This step is easy to skip, but it makes a big difference. A clean housing means your new air filter stays cleaner longer.
Also check the air filter gasket. This rubber seal sits on the underside of the housing cover. Make sure it is not cracked, brittle, or damaged. If the gasket looks worn, replace it before closing everything back up. A bad gasket can let unfiltered air enter the engine, which defeats the purpose of having a filter in the first place.
Step 5: Install the New Filter
Take your new Honda Civic air filter out of the box. Make sure it matches the shape and size of the old one. Place it into the housing in the same orientation as the old filter. The filter should sit flat and snugly against the bottom of the housing. There should be no gaps or tilting.
Double-check the air filter orientation before closing the housing. The filter usually has an arrow showing the direction of airflow. Make sure this arrow points in the correct direction toward the engine. Getting this wrong can reduce filtering effectiveness.
Step 6: Close the Housing and Secure It
Place the housing cover back on and press it down firmly. Reattach the clips or screws. Make sure everything is snug but do not overtighten. You should not need a lot of force to close the housing. If something feels stuck, double-check that the filter is seated correctly and the gasket is in place.
Start your engine and let it idle for a minute. Listen for any unusual sounds. A smooth, quiet idle is a good sign. You have just completed your engine air filter replacement on your Honda Civic.
Step-by-Step: How to Change the Cabin Air Filter
Not all Honda Civic models have a cabin air filter, but most newer ones do. The cabin filter cleans the air that enters your car through the vents. Changing it is just as easy as the engine filter, but the location is different.
Step 1: Find the Cabin Air Filter Location
On most Honda Civic models, the cabin air filter is located behind the glove box. Open the glove box and remove everything inside. On some models, you need to squeeze the sides of the glove box to release it from its hinges. Once the glove box is out of the way, you will see a plastic cover panel on the passenger side of the dashboard.
The cover usually has a few clips holding it in place. Use your flathead screwdriver or trim tool to gently pop the clips loose. Work slowly to avoid breaking any plastic pieces.
Step 2: Remove the Old Cabin Filter
Slide the old cabin filter out carefully. Note which direction the airflow arrow points. This is important for installing the new one correctly. The old filter will likely be dirty, especially if you drive in a dusty area or along unpaved roads.
Wipe down the filter housing with a clean cloth before inserting the new one. This removes any dust or debris that has accumulated inside.
Step 3: Install the New Cabin Filter
Insert the new cabin air filter in the same direction as the old one. The airflow arrow should point toward the dashboard vents. Push the filter in firmly until it is fully seated. Make sure it is not crooked or folded.
Slide the cover panel back into place and snap the clips back on. Reinstall the glove box. Your cabin air filter is now fresh, and the air inside your Honda Civic should smell cleaner and feel fresher.
How Often Should You Replace Your Honda Civic Air Filter?
The air filter replacement interval depends on your driving conditions and environment. Most manufacturers recommend replacing the engine air filter every 12,000 to 15,000 miles. For the cabin air filter, the interval is similar, usually every 12,000 to 15,000 miles as well.
However, these are just guidelines. If you drive in dusty conditions, on dirt roads, or in heavy traffic often, you may need to replace your filter more frequently. The same goes for people who live in dry, windy climates where more dust and debris are in the air.
Signs Your Filter Needs Replacing Sooner
- Reduced fuel efficiency – your car uses more gas than usual
- Sluggish acceleration – your car feels slow to respond
- Dark or dirty-looking filter – visible dirt and debris
- Unusual engine sounds – coughing or sputtering at idle
- Weak airflow from vents – the cabin filter may be clogged
- Unusual smells – musty or dusty odor from the vents
Checking your filter regularly is a great habit. You do not need to follow a strict mileage schedule. Just pop the housing open every few months and take a look. If the filter looks dirty, replace it. It is that simple.
Common Mistakes to Avoid When Changing Your Air Filter
Even though this is a simple job, people still make mistakes. Here are the most common ones and how to avoid them.
Installing the Filter Backwards
The air filter orientation matters. If you put the filter in backward, it will not filter air properly. Always check the airflow arrow before installing the new filter. The arrow should point in the direction air flows into the engine.
Forgetting to Check the Gasket
A worn or damaged air filter gasket can let unfiltered air bypass the filter entirely. Always inspect the gasket before closing the housing. Replace it if it looks cracked or brittle. This small step makes a big difference in keeping your engine properly protected.
Using the Wrong Filter Size
Not all air filter sizes are the same across Honda Civic model years. Using the wrong filter can lead to poor sealing, reduced filtration, and potential engine issues. Always double-check that the filter matches your specific model year and engine type.
Skipping the Cabin Air Filter
Many people forget about the cabin air filter entirely. If your Honda Civic has one, do not ignore it. A clogged cabin filter reduces airflow from your vents and can cause musty smells inside the car. It is an easy change that makes a noticeable difference in comfort.
Not Cleaning the Housing
Skipping the step where you wipe out the air box can leave debris inside. This dirt can contaminate your new filter faster. Taking 30 seconds to clean the housing keeps everything fresh and helps your new engine air filter last longer.
Quick Tips for a Better Air Filter Change
Here are some extra tips to make the process smoother and get the best results from your Honda Civic air filter replacement.
- Do the job on a cool engine. Wait at least 10 minutes after driving before opening the air filter housing. Hot engine parts can burn you.
- Keep a spare filter in your trunk. Having one on hand means you can replace it anytime, anywhere, without a trip to the store.
- Take a photo before removing the old filter. This helps you remember the correct orientation when installing the new one.
- Check the filter during oil changes. Make it a habit to inspect your air filter element every time you get an oil change. This keeps you on track with replacements.
- Consider a high-flow aftermarket filter. If you want a performance boost, aftermarket options like K&N filters offer increased airflow. Just make sure they fit your specific Honda Civic model.
These small tips can save you time, money, and headaches. They also help you get the most out of every air filter replacement you do.
Benefits of DIY Air Filter Replacement
There are many reasons to change your own Honda Civic air filter instead of paying a shop to do it. Here are the biggest benefits.
Cost savings are the most obvious one. A replacement filter costs between $10 and $25. A shop might charge $30 to $75 for the same job. Over time, doing it yourself adds up to significant savings.
Convenience is another major benefit. You do not need to make an appointment, drive to a shop, or wait for the work to be done. You can change the filter in your driveway, garage, or parking lot whenever it suits you.
Knowledge and confidence grow every time you do a DIY maintenance task. Once you learn how to change the air filter, you will feel more comfortable tackling other simple repairs. It builds a foundation of car care skills that serves you well as a vehicle owner.
Better maintenance awareness is a bonus benefit. When you do the work yourself, you see the condition of your parts firsthand. You notice wear and tear early. You catch small problems before they become big, expensive ones.
Conclusion
Changing the air filter on a Honda Civic is one of the simplest and most rewarding maintenance tasks you can do. It takes just a few minutes, costs very little, and makes a real difference in how your car performs. A clean engine air filter improves airflow, boosts fuel efficiency, and protects your engine from harmful debris. A clean cabin air filter keeps the air inside your car fresh and healthy.
By following the steps in this guide, you now have everything you need to replace both filters yourself with confidence. Remember to check your filters regularly, avoid common mistakes, and always use the right parts for your specific Honda Civic model year. Your car will thank you with smoother performance, better mileage, and a longer life.
Grab your new air filter, pop the hood, and give it a try today. Once you see how easy it is, you will never pay someone else to do it again. Happy DIYing.
Frequently Asked Questions
How do I know which air filter fits my Honda Civic?
Check your owner’s manual for the correct air filter size and part number. You can also look up your specific model year online or at any auto parts store. The OEM air filter is always a safe choice, but aftermarket options work well too as long as they match the specifications for your Civic.
Can I clean and reuse my Honda Civic air filter?
Most standard paper air filter elements are designed for single use and should be replaced rather than cleaned. However, some aftermarket aftermarket air filter options, like K&N reusable filters, can be cleaned and re-oiled. Check the manufacturer’s instructions for your specific filter type before attempting to clean it.
What happens if I drive with a dirty air filter?
A dirty air filter restricts airflow to your engine, which can reduce fuel efficiency, cause rough idling, and lower overall engine performance. Over time, a severely clogged filter can cause engine damage. Replacing it promptly is a cheap and easy way to avoid costly repairs.
How long does it take to change the air filter on a Honda Civic?
The entire Honda Civic air filter replacement process takes about 5 to 10 minutes for the engine filter and another 5 to 10 minutes for the cabin filter. It is one of the fastest and easiest maintenance jobs you can do at home.
Do all Honda Civic models have a cabin air filter?
Most Honda Civic models from 2006 onward come with a cabin air filter. Older models may not have one. Check your owner’s manual to confirm. If your Civic does have a cabin filter, it should be replaced regularly just like the engine filter.
Is it safe to change the air filter myself?
Absolutely. Changing the air filter is one of the safest and simplest DIY maintenance tasks. No special tools or mechanical knowledge is required. Just follow the steps carefully, and you will have it done in minutes. If you ever feel unsure, your Honda owner’s manual provides detailed guidance specific to your model year.