How to Fix Parking Brake Malfunction the Right Way
Learning how to fix parking brake malfunction issues can save you time and money. This guide walks you through every step needed to diagnose and repair your parking brake system safely. You will learn how to adjust cables, replace worn parts, and know when to call a pro. A working parking brake is essential for safety and keeping your vehicle in top shape. By the end, you will feel confident tackling this common repair yourself.
Your car’s parking brake malfunction can turn a simple drive into a stressful experience. Whether your parking brake won’t release or won’t hold, the problem needs attention fast. A stuck parking brake can damage your brake pads and rotors if you keep driving on it. This guide gives you everything you need to fix the issue correctly and safely.
We will walk you through each step with clear instructions. You do not need to be a professional mechanic to handle most of these repairs. With the right tools and a little patience, you can get your emergency brake working again. Let us dive into the details and get your vehicle safe to drive once more.
Key Takeaways
- Regular inspection of your parking brake cable prevents most malfunctions before they become serious problems.
- Adjusting the cable tension is the most common fix and can be done at home with basic tools.
- Stuck parking brake issues often come from corroded cables or seized caliper pistons that need cleaning or replacement.
- Replacing worn brake pads and hardware can restore proper parking brake release and engagement.
- Knowing when to call a mechanic saves you from costly mistakes and keeps your hydraulic brake system safe.
- Parking brake adjustment on a regular schedule extends the life of your entire brake system.
📑 Table of Contents
Understanding Your Parking Brake System
How the Parking Brake Works
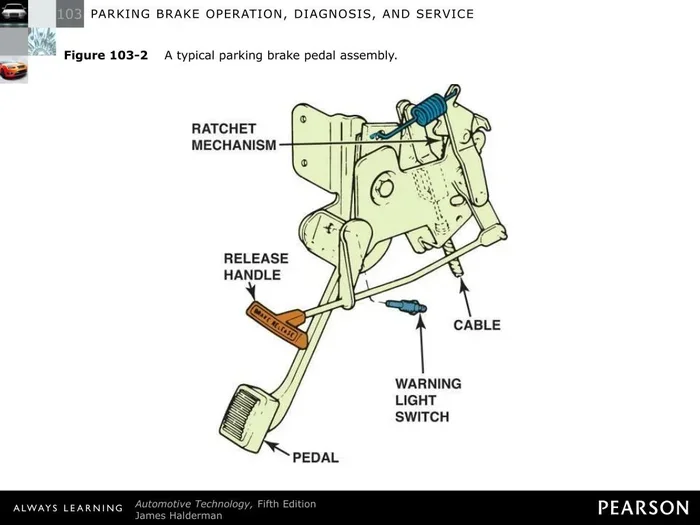
Your parking brake is a separate system from your regular foot brakes. It uses a cable to mechanically apply the brakes at the rear wheels. When you pull the parking brake lever or press the parking brake pedal, the cable tightens and pushes the brake shoes or calipers into place.
This system keeps your car stationary when parked. It also serves as an emergency backup if your main hydraulic brake system fails. The parking brake cable runs from the lever or pedal down to the rear brakes. Over time, this cable can stretch, corrode, or break. Understanding how it works helps you diagnose problems faster and choose the right fix.
The parking brake cable is the most vulnerable part of the system. It is exposed to road salt, moisture, and dirt every time you drive. This constant exposure leads to wear and corrosion. Regular brake system maintenance keeps the cable functioning smoothly and prevents many common issues.
Common Types of Parking Brakes
Most cars use one of three types of parking brake systems. The first is the lever-style hand brake found in many older vehicles. You pull it up with your hand. The second is the foot pedal style, common in trucks and some SUVs. You push down with your foot. The third is the electric parking brake, found in newer cars. You press a button on the dashboard.
Each type uses a parking brake cable to engage the rear brakes. Electric systems use motors instead of cables. The repair approach differs slightly between these types. Manual cable systems are the most common and the easiest to fix at home. Electric systems may require specialized diagnostic tools and professional service for complex issues.
Knowing which type your vehicle has helps you choose the right repair method. Check your owner’s manual if you are unsure. The manual also lists specific parking brake adjustment procedures for your model. Following the manufacturer’s guidelines ensures safe and effective repairs.
Signs Your Parking Brake Is Malfunctioning
Warning Lights and Dashboard Alerts
The parking brake warning light on your dashboard is the first sign something is wrong. This light looks like a circled “P” or an exclamation mark inside a circle. If it stays on after you release the brake, the system needs attention.
Sometimes the light flashes, which indicates a sensor or electrical issue. In vehicles with electric parking brakes, the dashboard may display a specific error message. Never ignore these warnings. Driving with a malfunctioning parking brake can cause further damage to your brake system and compromise your safety.
The parking brake warning light may also illuminate if the brake fluid level is low. Always check the fluid reservoir when you see this light. Low fluid can affect both your parking brake and your regular foot brakes. Addressing the issue early prevents more serious and expensive repairs down the road.
Physical Symptoms to Watch For
Pay attention to how your parking brake feels when you use it. If the lever or pedal feels loose and does not grip, the cable may be stretched. If the brake does not release fully, you may hear grinding or feel the car pulling to one side.
A burning smell after driving can mean the parking brake is dragging on the rear brakes. You might also notice uneven brake pad wear on the rear wheels. These are clear signs that your parking brake adjustment needs attention or a component has failed. A thorough brake rotor inspection can reveal additional damage caused by prolonged dragging.
Listen for unusual sounds when engaging or releasing the parking brake. Clicking or grinding noises often indicate a loose cable or worn brake components. The parking brake release should feel smooth and quiet. Any resistance or hesitation signals a problem that needs immediate attention.
Tools You Will Need to Fix a Parking Brake Malfunction
Essential Tools for the Job
Gathering your tools before you start makes the repair much smoother. Here is what you need for most parking brake repairs:
- Socket wrench set for removing bolts and caliper pins
- Adjustable wrench for cable nut adjustments
- Screwdriver set for removing trim and access panels
- Pliers for gripping and bending cable ends
- Jack and jack stands for safely lifting the vehicle
- Brake cleaner spray for cleaning corroded parts
- Wire brush for removing rust from cable sheathing
- Brake grease for lubricating moving parts
- Brake hardware kit for replacing worn clips and springs
Having all your tools ready before you start prevents frustrating delays. You do not want to be halfway through a repair and realize you need a specific wrench. Organize your workspace and lay out each tool in reach. A clean, well-lit work area makes any brake system maintenance task much easier and safer.
Safety Equipment You Should Not Skip
Working on your brake system requires proper safety precautions. Always wear safety glasses to protect your eyes from debris. Use work gloves to keep your hands clean and protected from sharp edges. Brake cleaner contains chemicals that can irritate your skin and eyes, so wear gloves at all times.
Make sure your vehicle is on a flat, level surface. Never work under a car supported only by a jack. Use jack stands rated for your vehicle’s weight. Keep a fire extinguisher nearby when working with brake cleaner and other chemicals. Safety always comes first when dealing with your brake system maintenance tasks.
How to Fix Parking Brake Malfunction: Step-by-Step Guide
Step 1: Diagnose the Problem
Before you start fixing anything, identify the exact issue. Is the parking brake not engaging properly? Is it not releasing? Or is it making unusual noises? Each problem points to a different cause and requires a different approach.
Start by checking the parking brake cable for visible damage. Look under the car for frayed or rusted sections of the cable housing. Next, check the brake fluid level in the master cylinder reservoir. Low fluid can affect brake performance and trigger the warning light. Finally, inspect the rear brake pads for uneven wear patterns. This diagnosis helps you choose the right fix and avoid unnecessary part replacements.
Also check the brake fluid level color. Fresh brake fluid is clear or light amber. Dark or brown fluid indicates contamination and may need a full flush. Contaminated fluid can cause the hydraulic brake system to perform poorly. Addressing fluid issues alongside your parking brake repair ensures a complete fix.
Step 2: Adjust the Parking Brake Cable
A loose cable is the most common cause of parking brake malfunction. The good news is that adjusting it is simple and requires minimal tools. Start by parking on a flat surface and setting the parking brake lever to the first click position.
Locate the cable adjustment point. On most cars, this is under the vehicle near the rear axle. Use an adjustable wrench to loosen the lock nut on the cable. Then turn the adjustment nut to take up slack. You want the cable tight enough that the rear brakes engage firmly but release completely when the lever is lowered.
After adjusting, test the parking brake release by driving a short distance at low speed. The brake should disengage fully without dragging or grinding. If it still feels loose, repeat the adjustment. Brake cable tension is critical for proper function. Too much tension causes dragging, while too little tension means the brake will not hold.
Make small adjustments and test frequently. Over-tightening the cable can cause premature wear on the rear brake pads. The goal is a balanced tension that holds the car firmly on an incline without causing drag during normal driving. This simple parking brake adjustment solves the majority of parking brake issues.
Step 3: Replace a Stuck or Damaged Parking Brake Cable
If adjusting the cable does not solve the problem, the cable itself may be damaged. A stuck parking brake often results from a corroded or frayed cable. Rust and road salt can eat through the cable housing over time, causing the cable to seize or break.
To replace the cable, start by disconnecting it from the lever or pedal under the dashboard. Use pliers to release any clips or fasteners holding the cable in place. Then remove the cable from the rear brake assembly by loosening the anchor bolt. Slide the new cable through the housing and reconnect it at both ends.
Make sure to use a parking brake cable replacement part that matches your vehicle model. After installation, adjust the cable tension as described in Step 2. Test the parking brake several times to ensure smooth operation. This emergency brake repair typically takes about one hour for most vehicles and costs between $50 and $150 for the replacement part.
While you have the rear wheels off, take the opportunity to inspect the surrounding brake hardware. Look for worn clips, damaged rubber boots, or corroded anchor points. Replacing worn hardware alongside the cable ensures a complete and lasting repair. This approach to brake system maintenance prevents repeat failures and keeps your parking brake reliable.
Step 4: Fix the Rear Brake Calipers
Sometimes the problem lies in the rear brake calipers themselves. The brake caliper piston can seize up due to corrosion or lack of maintenance. When this happens, the parking brake cannot release properly because the piston is stuck in the engaged position.
Start by lifting the vehicle and removing the rear wheels. Unbolt the caliper and carefully slide it off the brake rotor. Inspect the piston for corrosion or damage. Use brake cleaner spray and a small brush to clean the piston groove thoroughly. Apply a thin layer of brake grease to the piston boot to ensure smooth movement.
If the piston is severely damaged or the caliper bore is scored, you may need to replace the entire caliper. This is a more involved brake system maintenance task. After reinstalling the caliper, check that the parking brake release works smoothly. Pump the brake pedal a few times to seat the caliper pistons properly before testing the vehicle.
Consider replacing the rear brake pads at the same time if they show signs of uneven wear. A brake pad replacement paired with caliper work ensures optimal braking performance. Always use a quality brake hardware kit that includes new clips, springs, and dust boots. This comprehensive approach prevents future issues and extends the life of your entire rear brake assembly.
Step 5: Address Drum Brake Adjustments
Many rear brakes use drum brakes instead of disc brakes. The drum brake adjustment directly affects parking brake performance. When the shoes inside the drum wear down, the parking brake loses its holding power and the cable stretches further to compensate.
To adjust drum brakes, remove the rubber plug on the backing plate. Use a flathead screwdriver to turn the adjuster star wheel until the shoes grip the drum firmly. Then back off the adjuster slightly so the drum spins freely without binding. This ensures the parking brake engages properly without excessive lever travel.
Check the brake shoe wear while you are at it. If the shoes are worn thin or cracked, replace them with new ones. Worn brake shoes reduce stopping power and can cause the parking brake to slip. Always use a quality brake hardware kit to ensure proper fit and function. Proper drum brake adjustment is a key part of brake system maintenance and keeps your vehicle safe.
After adjusting the drums, test the parking brake on a slight incline. The vehicle should hold firmly without rolling. If it still slips, the brake shoe wear may be too advanced for adjustment alone. In that case, a full brake pad replacement and drum resurfacing or replacement is necessary. A thorough brake rotor inspection of the rear drums completes the job.
When to Call a Professional Mechanic
Complex Brake System Issues
Some parking brake malfunction problems are beyond DIY repair. If you notice a leak in the hydraulic brake system, stop driving immediately. Brake fluid leaks can lead to complete brake failure and put your safety at serious risk. A professional mechanic has the tools and training to handle hydraulic repairs safely and effectively.
Also call a pro if the parking brake warning light stays on after you have adjusted the cable and checked the fluid. This could indicate a sensor failure or an electrical issue in vehicles with electric parking brakes. Complex problems like brake caliper piston seizure deep inside the caliper bore may require specialized equipment and expertise that a home mechanic does not have.
Vehicles with rear disc brakes that use a screw-type parking brake mechanism are another case for professional service. These systems require specific tools for proper parking brake cable replacement and calibration. Attempting to repair them without the right equipment can lead to improper function and safety hazards. Always err on the side of caution with complex emergency brake repair needs.
Cost Considerations for Parking Brake Repair
The cost to fix a parking brake malfunction varies widely depending on the root cause. A simple cable adjustment costs little to nothing if you do it yourself. Replacing a parking brake cable typically runs between $50 and $150 for parts alone. Brake pad replacement at the rear can add another $100 to $300 depending on your vehicle.
More complex repairs like caliper replacement can cost $200 to $500 per wheel. The brake rotor inspection may reveal additional damage that increases the total cost. Getting a quote from a trusted mechanic helps you decide whether to DIY or seek professional help. Always factor in your safety when making this decision. A properly functioning parking brake is not worth compromising for the sake of saving a few dollars.
Consider the value of your time as well. If a repair requires specialized tools or extensive experience, paying a professional may be the smarter choice. Many shops offer free or low-cost brake inspections. Use these services to get a clear picture of what needs to be done before committing to a repair. This approach keeps your parking brake reliable and your budget in check.
Preventing Future Parking Brake Problems
Regular Maintenance Tips
The best way to avoid parking brake malfunction is through regular maintenance. Inspect your parking brake cable every six months for signs of rust or fraying. Apply brake cleaner and a protective coating to the cable housing to prevent corrosion from road salt and moisture. This simple habit adds years to the life of your parking brake system.
Use your parking brake regularly, even if you park on flat ground. Regular use keeps the cable tensioned and prevents the system from seizing up. When you do use the parking brake, engage it fully and release it completely. Partial engagement causes uneven wear and premature cable stretch. Make parking brake adjustment part of your routine vehicle care schedule.
Have your brake pads and brake rotors inspected during every oil change. Catching wear early prevents more expensive repairs down the road. Ask your mechanic to check the parking brake cable tension and the rear brake calipers during each inspection. This proactive approach to brake system maintenance keeps everything working as it should and gives you peace of mind every time you park.
Best Practices for Long-Term Brake Health
Always release your parking brake before driving. Driving with the brake engaged causes rapid brake pad wear and can damage the rear brake rotors through excessive heat buildup. In cold weather, ice can freeze the parking brake cable, making release difficult. Gently rocking the vehicle or applying the foot brake lightly can help break the ice free without damaging the cable.
If you notice any warning signs, address them immediately. Delaying repairs turns small problems into major ones. A slight dragging parking brake today can become a seized cable and ruined rear brake pads next month. The cost of a quick fix is always far less than the cost of a full brake system overhaul.
Keep your brake fluid level topped off and change it according to your vehicle’s maintenance schedule. Old brake fluid absorbs moisture and can cause corrosion inside the hydraulic brake system. Fresh fluid ensures consistent parking brake performance and protects the entire brake system from internal damage. Following these simple practices keeps your parking brake reliable for years to come and your vehicle safe on every journey.
Fixing a parking brake malfunction does not have to be scary or overwhelming. With the right knowledge and tools, most repairs are manageable at home. Start with the simplest fix, like cable adjustment, and work your way up to more complex repairs as your confidence grows. Your safety and your wallet will both thank you for taking action.
Remember that your parking brake is a critical safety feature. Never ignore warning signs or delay necessary repairs. A well-maintained parking brake system gives you confidence every time you park your car on any incline or road. Take action today, follow the steps in this guide, and enjoy the peace of mind that comes with a properly functioning brake system.
Conclusion
Dealing with a parking brake malfunction does not have to be overwhelming. You now have the knowledge to diagnose the problem, adjust the cable, replace damaged parts, and know when to seek professional help. Regular maintenance and prompt attention to warning signs keep your brake system working reliably for the long haul.
Take the time to inspect your parking brake cable and rear brakes on a regular schedule. Small preventive actions today prevent big repairs tomorrow. Your parking brake is a vital safety feature that deserves your attention and care. Every time you engage and release the brake properly, you extend the life of the entire system.
Now that you understand how to fix parking brake malfunction issues, you are ready to tackle the repair with confidence. Grab your tools, follow the steps in this guide, and get back on the road safely. Your vehicle and your peace of mind are worth the effort. Drive safe, stay proactive, and keep your parking brake in top condition for every journey ahead.
Frequently Asked Questions
What causes a parking brake to fail to release?
The most common cause is a corroded or stretched parking brake cable. Over time, rust and grime build up on the cable, preventing it from sliding freely. A seized brake caliper piston can also prevent proper release. In some cases, the rear brake pads have worn down and are gripping the drum or rotor too tightly. Start by checking the cable and calipers for visible damage or corrosion.
How do I know if my parking brake cable needs replacement?
Inspect the cable for fraying, rust, or kinks along its full length. If the cable stretches beyond the adjustment range and the parking brake still feels loose, replacement is needed. You may also notice the cable housing is damaged or the cable does not move smoothly when you pull the lever. A simple parking brake adjustment should fix minor slack, but a damaged cable requires full parking brake cable replacement.
Can I drive with a parking brake malfunction?
It is not recommended. Driving with a stuck parking brake can overheat the rear brakes and cause damage to the brake pads and brake rotors. In severe cases, the friction can lead to a fire hazard. If your parking brake will not release, have the vehicle towed to a repair shop. Safety should always come first when dealing with any brake system issues.
How much does it cost to fix a parking brake malfunction?
The cost depends on the root cause of the problem. A simple cable adjustment costs little to nothing if you do it yourself. Replacing a parking brake cable typically costs $50 to $150 for parts. If the rear brake calipers or brake pads need replacement, the total cost can range from $150 to $500 or more. Always get a professional quote for complex repairs involving the hydraulic brake system.
How often should I adjust my parking brake?
Most vehicles need a parking brake adjustment every 10,000 to 20,000 miles. However, the interval depends on your driving habits and conditions. Vehicles driven in salty or humid climates may need more frequent adjustments. Inspect your parking brake cable and full system during every oil change to catch problems early before they become expensive repairs.
What is the difference between a parking brake and an emergency brake?
There is no functional difference between the two terms. Parking brake and emergency brake refer to the exact same system on your vehicle. It is called a parking brake because it is primarily used to hold the vehicle when parked. It earns the name emergency brake because it can serve as a backup if your main foot brakes fail. Both systems rely on the same parking brake cable and rear brake components to function.