What to Do If the Hood Release Is Broken on Your Car
A broken hood release can leave you stranded or unable to check your engine. This guide walks you through what to do if the hood release is broken, from simple DIY fixes to knowing when to seek professional help. You will learn how to open a stuck hood, what tools you need, and how to prevent hood latch problems in the future.
You reach for the hood release handle, give it a pull, and nothing happens. Your heart sinks. You need to check your engine oil, and now your hood release is broken. This is a frustrating situation, but it is more common than you think. Thousands of drivers deal with a stuck or broken hood every year. The good news is that you have options. You do not need to panic or call a tow truck right away. This guide will show you exactly what to do if the hood release is broken on your car.
We will cover simple fixes you can try at home, the tools you need, and how to prevent this problem from happening again. Whether your hood release cable snapped, your latch is stuck, or the handle feels loose, we have got you covered. Let us get your hood open safely.
Key Takeaways
- Safety First: Always pull over safely and turn off the engine before attempting any hood release fix.
- DIY Methods Work: You can often open a broken hood release using a cable puller, wire hanger, or emergency release lever.
- Know Your Car: Most vehicles have a secondary hood latch mechanism hidden under the front bumper or grille.
- Prevent Future Issues: Regular maintenance and lubrication can keep your hood latch working smoothly for years.
- Call a Pro When Needed: Some hood latch problems require a mechanic, especially if the cable or internal mechanism is severely damaged.
- Replacement Costs Are Reasonable: Hood latch repair and replacement typically cost between $50 and $200.
- Act Fast: Ignoring a broken hood release can lead to further damage or safety hazards on the road.
📑 Table of Contents
- Why Your Hood Release Might Be Broken
- How to Open Your Hood When the Release Is Broken
- Tools You Will Need for Hood Latch Repair
- How to Replace a Broken Hood Release Cable
- Hood Release Repair Cost and When to See a Mechanic
- How to Prevent Hood Release Problems in the Future
- Quick Tips for Emergency Situations
- Common Mistakes People Make With a Broken Hood Release
- Expert Insight: What Mechanics Wish You Knew
- Conclusion
Why Your Hood Release Might Be Broken
Before you start troubleshooting, it helps to understand what could have gone wrong. The hood release system is not complicated. It has a few moving parts, and any one of them can fail over time. Here are the most common reasons your hood latch stops working.
Worn Out Hood Release Cable
The hood release cable connects the handle inside your car to the latch under the hood. Over time, this cable can stretch, fray, or even snap. If the cable breaks, pulling the handle does nothing. This is the most common cause of a broken hood release. Older cars are especially prone to this issue because the cable gets a lot of use over the years.
Rust and Corrosion
Moisture and road salt can cause rust to build up inside the hood latch mechanism. When rust accumulates, the latch gets stiff or freezes in place. You might hear a clicking sound when you pull the handle, but the latch will not release. This is especially common in colder climates where cars are exposed to winter road conditions.
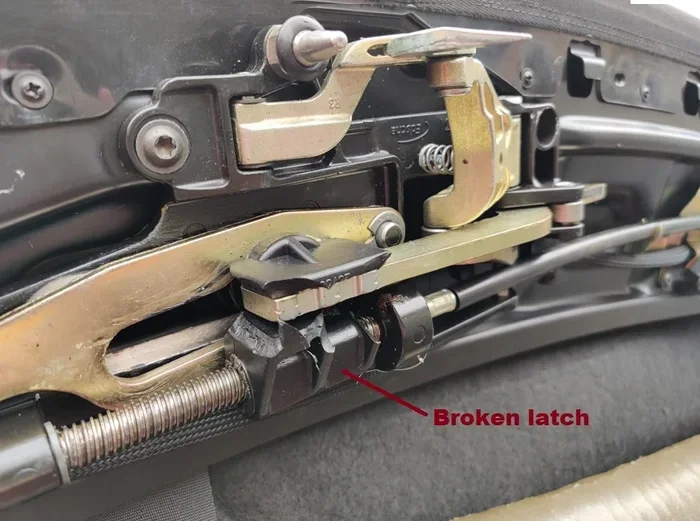
Broken Latch Spring
Inside the hood latch, there is a small spring that helps the latch open and close. If this spring breaks or pops out, the latch gets stuck. The hood latch mechanism relies on this spring to return to the open position. Without it, the hood stays locked even when you pull the release.
Handle or Lever Damage
Sometimes the problem is not the cable or latch but the handle itself. The plastic or metal handle can crack, break, or detach from the cable. If the handle comes loose, you will not be able to engage the cable properly. This is an easy fix, but it requires you to open the hood first.
Child Safety Lock Engagement
Some vehicles have a secondary latch or child safety lock for the hood. If this feature gets engaged accidentally, the hood will not open even when the primary release works. This is an easy fix but often overlooked.
How to Open Your Hood When the Release Is Broken
Now that you know what might be wrong, let us talk about how to actually get that hood open. There are several methods you can try. Start with the simplest one and work your way down the list. Most of the time, you can open a stuck hood without calling a mechanic.
Method 1: Use the Secondary Hood Release
Most modern cars have a secondary hood release built into the design. This is a safety feature that lets you open the hood from outside the car if the primary release fails. Here is how to find it:
- Step 1: Walk to the front of your car and look under the front bumper or grille.
- Step 2: Feel along the bottom edge of the bumper for a small lever or tab.
- Step 3: Push, pull, or lift this lever toward you. You may need to use some force.
- Step 4: The hood should pop up slightly. Go back to the driver’s seat and lift the hood the rest of the way.
Not sure where yours is? Check your owner’s manual. The hood release troubleshooting steps are usually listed there. This method works on most cars made after 2000.
Method 2: Use a Long Wire or Coat Hanger
If your car does not have a secondary release, or it is also stuck, you can try using a wire to reach the latch from underneath. Here is what you need:
- A wire coat hanger or a long stiff wire
- Gloves to protect your hands
- A flashlight to see inside the engine bay
- Straighten out the wire coat hanger as much as possible.
- Bend one end into a small hook shape.
- Slide the wire through the grille or a gap near the bumper.
- Feel around for the hood latch cable or the latch itself.
- Hook the cable or pull the latch gently toward you.
- The hood should release and pop up slightly.
This method takes a little patience. Go slowly and do not force the wire. You do not want to damage the hood release mechanism or the radiator fins.
Method 3: Use a Hood Release Tool or Cable Puller
Auto parts stores sell hood release tools that are specifically designed for this situation. These tools are inexpensive and very effective. A cable puller lets you grab the hood release cable directly and pull it to release the latch. This is probably the most reliable DIY method if the cable is still intact but the handle is broken.
You can also use a pair of needle-nose pliers to grip the cable directly. Look for the cable where it connects to the latch under the hood. Pull the cable toward the front of the car to release the latch. This works great if the cable is still attached but the handle inside the car is broken.
Method 4: Remove the Front Grille or Bumper Cover
This is more advanced, but it works if nothing else does. Some cars have clips holding the front grille or bumper cover in place. You can remove these clips with a flathead screwdriver or a trim removal tool. Once the cover is off, you can see the latch mechanism directly and manually push or pull it open.
Be careful here. Plastic clips can break easily. Only try this method if you are comfortable working on your car. If you are not sure, skip to the next section and call a professional.
Method 5: Call a Roadside Assistance Service
If none of the above methods work, it is time to call for help. AAA, insurance roadside assistance, or a local tow truck can help you open the hood safely. This is the best option if you are stranded on the side of the road or if you are not comfortable working under the hood yourself.
Most roadside assistance plans cover this type of service at no extra cost. It is always better to be safe than to risk damaging your car by forcing something open.
Tools You Will Need for Hood Latch Repair
If you decide to fix the hood latch yourself, having the right tools makes the job much easier. Here is a list of tools you should have on hand:
- Flathead and Phillips screwdrivers – for removing panels and covers
- Needle-nose pliers – for gripping and pulling cables
- Wire coat hanger – for reaching the latch from outside
- Lubricant spray (WD-40 or silicone spray) – for freeing stuck latches
- Flashlight – for seeing inside the engine bay
- Replacement hood release cable – if the old one is broken
- Trim removal tool set – for safely removing plastic clips
- Socket wrench set – for removing bolts on the latch assembly
You do not need all of these for every fix. Start with the basics and add tools as needed. A hood latch repair kit from an auto parts store usually includes everything you need for most common problems.
How to Replace a Broken Hood Release Cable
If your hood release cable is broken or frayed, replacing it is the best long-term fix. Here is a step-by-step guide to doing it yourself.
Step 1: Remove the Old Cable
First, you need to access the cable. Start by removing the hood latch cover inside the engine bay. This is usually held on by a few screws or clips. Once the cover is off, you will see the cable end where it connects to the latch. Use your pliers to unclip the cable from the latch. Then trace the cable back to the handle inside the car and disconnect it there too.
Step 2: Feed the New Cable Through
Take your new hood release cable replacement and feed it through the same path as the old one. Start from the handle end and work your way toward the latch. Make sure the cable is not kinked or twisted. A kinked cable will not pull smoothly and can cause the same problem again.
Step 3: Connect the New Cable to the Latch
Once the cable is in place, attach it to the latch mechanism. Most latches have a small clip or bracket that holds the cable end. Make sure it is secure and that there is no slack in the cable. Too much slack means the handle will feel loose and the release will not work properly.
Step 4: Test the New Cable
Before you close everything up, test the new cable. Pull the handle inside the car and make sure the latch releases smoothly. If it does, replace the hood latch cover and you are good to go. If it does not, check the cable tension and make sure the connection is secure.
Pro Tip: Spray a little lubricant on the latch mechanism after installing the new cable. This will help the latch move freely and extend the life of your new cable.
Hood Release Repair Cost and When to See a Mechanic
Wondering how much it costs to fix a broken hood latch? The answer depends on what is wrong and where you take your car. Here is a rough breakdown.
| Repair Type | Average Cost | DIY Possible? |
|---|---|---|
| Hood release cable replacement | $20-$50 for parts | Yes |
| Hood latch replacement | $50-$150 for parts | Yes, with tools |
| Hood latch spring repair | $10-$30 for parts | Yes |
| Professional hood latch repair | $100-$200 total | No |
| Full hood latch assembly replacement | $150-$300 total | No |
As you can see, most hood latch repair cost estimates are quite reasonable. DIY repairs can save you a lot of money. However, if you are not confident in your ability to fix the problem, it is worth paying a mechanic. A professional will diagnose the issue quickly and fix it right the first time.
You should also see a mechanic if your hood release troubleshooting efforts do not work after trying the methods above. Sometimes the problem is deeper inside the latch assembly and requires specialized tools to access.
How to Prevent Hood Release Problems in the Future
The best way to deal with a broken hood release is to prevent it from happening in the first place. Here are some simple steps you can take to keep your hood latch working smoothly for years.
- Lubricate the latch regularly. Spray a silicone-based lubricant on the hood latch every 6 months. This prevents rust and keeps the mechanism moving freely.
- Check the cable for wear. Inspect the hood release cable once a year. Look for fraying, kinks, or slack. Replace the cable at the first sign of wear.
- Avoid slamming the hood. Slamming the hood can damage the latch and the cable over time. Close the hood gently but firmly.
- Keep the engine bay clean. Dirt and debris can get into the latch mechanism and cause it to stick. Rinse the area under the hood occasionally.
- Address small problems early. If your hood feels stiff or the handle feels loose, do not ignore it. Fix small issues before they become big problems.
Taking these simple precautions can save you from a lot of headaches down the road. A little maintenance goes a long way when it comes to your car’s hood release mechanism.
Quick Tips for Emergency Situations
What if your hood release breaks while you are driving or in an unfamiliar place? Here are some quick tips to keep in mind:
- Always carry a flashlight. You never know when you will need to look under the hood in low light.
- Keep a small wire in your trunk. A coat hanger or a piece of stiff wire can save the day when the release fails.
- Know your owner’s manual. It has specific instructions for your car’s hood release system, including the location of any secondary release.
- Save your roadside assistance number. If you cannot open the hood yourself, a quick call can get you back on the road.
- Do not drive with the hood open. If the hood is stuck partially open, pull over safely and secure it before continuing to drive.
These tips can make a big difference in an emergency. Being prepared is half the battle when it comes to car troubles.
Common Mistakes People Make With a Broken Hood Release
When people are frustrated and their hood will not open, they sometimes make mistakes that make the problem worse. Here are common errors to avoid:
- Forcing the hood open. Yanking on the hood can damage the latch, the hinges, or even the windshield. Always use the proper release methods.
- Using the wrong tools. Using pliers or screwdrivers incorrectly can scratch or break plastic parts around the latch. Be gentle and use the right tools.
- Ignoring the problem. A broken hood release might seem minor, but it can lead to bigger issues. The hood can fly open while driving, which is extremely dangerous.
- Not checking the cable first. Many people assume the latch is broken when the real problem is the cable. Always check the cable before replacing the latch.
- Over-lubricating. Too much lubricant can attract dirt and grime, which makes the problem worse. Use a light spray and wipe off excess.
Avoiding these mistakes will help you fix the problem faster and avoid causing additional damage to your vehicle.
Expert Insight: What Mechanics Wish You Knew
We spoke with a few experienced auto mechanics about hood release problems. Here is what they had to say:
“The number one thing I tell customers is to check the cable before anything else. Nine times out of ten, the cable is the culprit, not the latch. It is a cheap and easy fix.” – Mike R., ASE Certified Mechanic
“People also forget about the secondary release. They panic when the handle does not work, but there is almost always a backup release somewhere on the car. Check your owner’s manual or look under the bumper.” – Sarah T., Auto Shop Owner
“Regular maintenance is the best defense against hood release issues. A little spray lubricant and a visual inspection every few months can prevent 90% of these problems.” – David L., Mobile Mechanic
These expert tips reinforce what we have covered in this guide. The key is to stay calm, check the simple things first, and know when to call for help.
Conclusion
Dealing with a broken hood release is stressful, but it does not have to be a nightmare. Now you know exactly what to do if the hood release is broken on your car. You have several methods to try, from using the secondary release to replacing the cable yourself. You also know how much the repairs cost and when to call a professional.
Remember to stay safe first. Pull over carefully, turn off the engine, and take your time working through the solutions. Most hood release problems are simple and inexpensive to fix. With the right tools and a little patience, you can get back on the road in no time.
Keep this guide bookmarked for future reference. Share it with a friend who might need it someday. And most importantly, take care of your car’s hood latch mechanism with regular maintenance so you never have to deal with this problem in the first place.
Now go ahead and give your hood release a check. A few minutes of preventive care today can save you hours of frustration tomorrow.
Frequently Asked Questions
Can I drive my car if the hood release is broken?
You can drive short distances if the hood is fully closed and secure. However, driving with a broken hood release is risky because the hood could open unexpectedly at highway speeds. It is best to fix the issue as soon as possible to avoid accidents or further damage to your vehicle.
How much does it cost to replace a hood release cable?
A hood release cable typically costs between $10 and $50 for the part alone. If you replace it yourself, you only pay for the part. If you take your car to a mechanic, labor costs will add another $50 to $100 to the total. Overall, it is one of the more affordable car repairs you can do.
Where is the secondary hood release located?
The secondary hood release is usually found under the front bumper or grille, near the center of the car. It is a small lever or tab that you push, pull, or lift to release the hood latch. Check your vehicle owner’s manual for the exact location in your specific car model.
What causes a hood release cable to break?
Hood release cables break due to normal wear and tear over time. Rust and corrosion from moisture exposure can weaken the cable. Frequent use, especially in older vehicles, also contributes to cable failure. In some cases, a cable can be damaged if the hood is forced open or closed improperly.
Can I use WD-40 to fix a stuck hood latch?
Yes, WD-40 can help free a stuck hood latch by dissolving rust and lubricating the moving parts. Spray a small amount directly onto the latch mechanism and work it back and forth several times. However, WD-40 is a temporary fix. For long-term lubrication, use a silicone-based spray designed for automotive use.
How long does it take to replace a hood release cable?
If you have basic mechanical skills, replacing a hood release cable takes about 30 minutes to an hour. The process involves removing the old cable, threading the new one through the same path, and connecting it to the latch and handle. If you are doing it for the first time, give yourself extra time and keep your owner’s manual nearby for reference.
=== CONCLUSION ===
What to do if the hood release is broken is a question many drivers face at some point. The good news is that you now have all the knowledge and practical steps to handle this situation confidently. From understanding why your hood release mechanism fails to trying DIY fixes and knowing when to call a professional, you are fully prepared. Keep your hood latch maintained, stay calm in emergencies, and remember that most hood release problems have simple, affordable solutions.