How Do You Change Car Oil for Beginners Step by Step
Learning how do you change car oil for beginners is easier than you think. This step-by-step guide walks you through the entire process, from gathering your tools to adding fresh oil. You will save money, gain real confidence, and keep your engine running strong with these simple DIY oil change tips.
Changing your own oil might sound scary at first. But trust me, it is one of the easiest things you can do for your car. Once you learn how do you change car oil for beginners, you will wonder why you ever paid a mechanic to do it. This guide breaks everything down into simple steps. You do not need to be a car expert. You just need a little time and the right tools.
Your car needs fresh oil to run smoothly. Old oil gets dirty and loses its power over time. It stops lubricating your engine the way it should. That can lead to serious damage down the road. A regular oil change keeps your engine healthy and extends the life of your vehicle. Plus, doing it yourself saves you a lot of money.
Whether you have a sedan, truck, or SUV, the basic process is the same. This guide covers everything from picking the right oil to disposing of the old stuff safely. By the end, you will feel confident tackling your first oil change. Let us get started.
Key Takeaways
- You Can Save Money: Changing your own oil costs a fraction of what a shop charges.
- It Is Easier Than You Think: With the right tools and a little patience, anyone can do it.
- You Will Need Basic Tools: A socket wrench, oil filter wrench, jack stands, and a drain pan are all you need.
- Check Your Owner’s Manual: Always follow the manufacturer’s recommendations for oil type and change intervals.
- Safety Comes First: Wear safety glasses and gloves, and never work under a car supported only by a jack.
- Dispose of Old Oil Properly: Take used oil to a recycling center or auto parts store.
📑 Table of Contents
Why Changing Your Own Oil Matters
Many car owners skip oil changes or pay others to do them. But changing your own oil has real benefits. First, it saves you a significant amount of money. A typical oil change at a shop costs between $50 and $100. When you do it yourself, you spend maybe $20 to $40 on oil and a new filter. That is a big difference over time.
Second, you learn more about your vehicle. Understanding how your car works gives you confidence. You will know what is normal and what is not. If something feels off, you will be better equipped to spot problems early. This knowledge can save you from expensive repairs later on.
Third, you control the quality of the parts you use. You can choose the best oil and filter for your car. No upsells, no guesswork. You pick exactly what your vehicle needs.
Quick Tips for Beginners
- Watch a few video tutorials before you start. Seeing the process helps a lot.
- Read your owner’s manual first. It has all the specs you need.
- Buy extra oil. You might need a little more than the standard amount.
- Set aside about 30 to 45 minutes for your first oil change.
- Do not rush. Take your time and stay safe.
What You Need Before You Start
Before you get under your car, gather everything you need. Having all your supplies ready makes the process much smoother. You do not want to be halfway through and realize you are missing something.
Essential Tools and Supplies
Here is a list of what you will need for your oil change:
- New engine oil – check your owner’s manual for the right amount and type
- New oil filter – make sure it fits your vehicle model
- Socket wrench – the right size for your drain plug
- Oil filter wrench – helps loosen the old filter
- Jack and jack stands – never rely on a jack alone
- Drain pan – to catch the old oil
- Torque wrench – for tightening the drain plug to the correct spec
- Safety glasses – protects your eyes from drips
- Mechanic gloves – keeps your hands clean and safe
- Drip tray – protects your driveway or garage floor
- Rags or paper towels – for spills and cleanup
Most of these items are reusable. You only need to buy fresh oil and a new filter each time. A good socket set and oil filter wrench are worth the investment if you do not already have them.
Choosing the Right Oil and Filter
Not all oil is the same. Your owner’s manual will tell you the right oil viscosity for your engine. Viscosity refers to how thick or thin the oil is at different temperatures. Common grades include 5W-30, 10W-30, and 0W-20.
You also need to decide between synthetic oil and conventional oil. Synthetic oil lasts longer and performs better in extreme temperatures. It costs more upfront but can extend your oil change interval. Conventional oil is cheaper but needs to be changed more often.
| Feature | Synthetic Oil | Conventional Oil |
|---|---|---|
| Price per quart | $5 to $8 | $3 to $5 |
| Change interval | 7,500 to 15,000 miles | 3,000 to 5,000 miles |
| Performance in extreme heat | Excellent | Good |
| Performance in cold weather | Excellent | Fair |
| Engine protection | Superior | Good |
| Best for | High-performance engines | Everyday driving |
For most beginners, conventional oil works just fine. It is affordable and easy to find. As you gain experience, you can explore synthetic blends or full synthetic options.
When picking an oil filter, look for one that matches your vehicle. Brand-name filters like Fram, Mobil 1, and Valvoline are reliable choices. A quality filter removes more contaminants from your engine oil.
Step-by-Step Oil Change Guide
Now comes the fun part. Follow these steps carefully and you will have a clean, successful oil change in no time.
Step 1: Prepare Your Vehicle
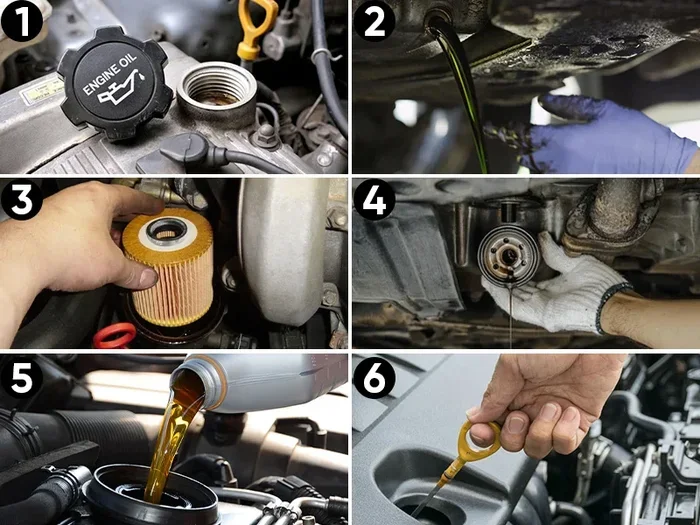
Start by parking your car on a flat, level surface. Turn off the engine and let it cool for about 10 minutes. Warm oil drains better than cold oil, so do not let it cool completely. Pop the hood and locate the oil fill cap. This makes it easier for the oil to flow out later.
Put on your safety glasses and mechanic gloves. Place your drip tray under the car where the oil will drain. Lay out all your tools so they are within easy reach.
Step 2: Lift and Secure the Car
Use your jack to lift the front of the car. Place jack stands under the frame once the car is up. Never get under a car that is only supported by a jack. Jack stands are your safety net. Give the car a gentle push to make sure it is stable.
Now you can slide under the car comfortably. Locate the drain plug on the bottom of the oil pan. It is usually a large bolt on the engine block.
Step 3: Drain the Old Oil
Position your drain pan directly under the drain plug. Use your socket wrench to loosen the plug. Turn it counterclockwise. Be careful, the oil will be warm.
Once the plug is loose, unscrew it by hand. Let the old oil flow out completely into the drain pan. This takes about 5 to 10 minutes. While you wait, take a look at the drain plug and the washer. If either looks damaged, replace them before you refill.
When the oil stops dripping, wipe the plug clean with a rag. Reinstall it and tighten it with your torque wrench. Do not over-tighten. Check your owner’s manual for the correct torque specification. Usually it is around 25 to 35 foot-pounds.
Step 4: Replace the Oil Filter
Now move to the oil filter. It is usually located near the front or side of the engine. Use your oil filter wrench to loosen the old filter. Turn it counterclockwise. It may be tight, so use steady pressure.
Before installing the new filter, lightly coat the rubber gasket with a little bit of fresh oil. This creates a better seal and makes future removal easier. Screw the new filter on by hand. Tighten it snugly but do not over-tighten. Most filters hand-tighten about three-quarters of a turn after the gasket touches the engine.
Step 5: Add New Oil
Go back to the top of the engine. Remove the oil fill cap and set it aside. Use a funnel to pour in the new oil. Add about three-quarters of the recommended amount first. Wait a minute for the oil to settle, then check the dipstick.
The dipstick will show you the current oil level. Add more oil gradually until it reaches the full mark. Do not overfill. Too much oil can cause pressure problems in your engine.
Once you are at the right level, replace the oil fill cap. Wipe up any spills with a rag.
Step 6: Check Everything
Now it is time to do a final check. Start the engine and let it run for about 30 seconds. Look under the car for any leaks around the drain plug and oil filter. If you see drips, turn off the engine and tighten the connection slightly.
Turn off the engine and wait a few minutes for the oil to settle. Pull the dipstick again and check the oil level. Top off if needed.
Also check the oil pressure warning light on your dashboard. It should turn off once the engine is running. If it stays on, turn off the engine and check your oil level again.
Common Mistakes Beginners Make
- Forgetting to replace the drain plug washer. This can cause leaks over time.
- Over-tightening the drain plug. This can strip the threads and cause expensive damage.
- Using the wrong oil type. Always match the oil to your engine’s specifications.
- Skipping the oil filter. A new filter is essential for clean oil circulation.
- Not checking for leaks. Always inspect under the car after starting the engine.
- Overfilling the oil. Too much oil can foam and reduce lubrication.
Quick Tips for a Smooth Oil Change
A few extra tips can make your oil change even easier and more effective:
- Keep a maintenance log. Write down the date and mileage of each oil change. This helps you stay on track.
- Recycle your old oil. Pour the used oil into a sealed container and take it to a recycling center or auto parts store. Never dump oil down a drain or on the ground.
- Change your oil filter every time. Even if your oil is still good, a dirty filter reduces engine performance.
- Use a creeper if you have one. It makes sliding under the car much more comfortable.
- Take photos as you go. If you ever need to remember how something was connected, a photo is worth a thousand words.
Expert Insights
Experienced mechanics recommend checking the oil level every two weeks. This simple habit helps you catch leaks early and keeps your engine running at peak performance. Also, do not ignore the oil change warning light on your dashboard. It is there for a reason.
According to automotive experts, the old rule of changing oil every 3,000 miles is outdated for most modern vehicles. Advances in engine technology and oil formulation mean many cars can go 5,000 to 7,500 miles between changes. Always defer to your manufacturer’s recommendation in the owner’s manual.
If you notice your oil is dark brown or black, it is time for a change. Fresh oil is amber in color. As it collects engine debris and combustion byproducts, it darkens. Do not wait for the oil to turn completely black before you change it.
How Often Should You Change Your Oil?
The answer depends on your vehicle, your driving habits, and the type of oil you use. Most manufacturers recommend an oil change every 5,000 to 7,500 miles for conventional oil. If you use synthetic oil, you can often go 10,000 to 15,000 miles.
However, driving conditions matter too. If you frequently drive in stop-and-go traffic, tow heavy loads, or drive in extreme heat or cold, you may need to change your oil more often. These are considered “severe” driving conditions and they break down oil faster.
A good rule of thumb is to check your oil level monthly and change it at least twice a year, even if you have not hit the mileage mark. Oil degrades over time, even if you do not drive much. Moisture and contaminants can build up in the oil, reducing its effectiveness.
Keep in mind that your vehicle’s oil change interval is a guideline, not a strict rule. If your oil looks or smells off, change it regardless of the mileage. Trust your instincts and stay proactive about your vehicle maintenance.
Final Thoughts
Learning how do you change car oil for beginners opens up a world of confidence and savings. You do not need to be a mechanic to handle this basic maintenance task. With the right tools, a little patience, and this guide, you can change your oil like a pro.
Start with your first oil change on a weekend morning when you have plenty of time. Do not stress about doing it perfectly. Every oil change gets easier and faster. Before long, it will become second nature.
Your engine works hard for you every day. Giving it fresh, clean oil is one of the best things you can do. So grab your tools, roll up your sleeves, and give it a try. Your car and your wallet will thank you.
Frequently Asked Questions
Do I Need to Warm Up My Engine Before Draining the Oil?
Yes, slightly warming the oil helps it flow out more smoothly. Let the engine run for about 2 to 3 minutes, then turn it off. Do not let it get too hot, or you risk burning yourself. The oil should be warm but not scorching.
Can I Reuse the Old Oil Filter?
No, always use a new oil filter. Old filters are clogged with debris and contaminants. Reusing them reduces the quality of your fresh oil and can harm your engine over time.
What Should I Do If I Strip the Drain Plug Threads?
If you strip the threads, do not try to drive the car. Take it to a mechanic. Stripped drain plug threads are a serious issue that requires professional repair. To prevent this, use the correct size socket and do not over-tighten.
How Do I Know What Type of Oil My Car Needs?
Check your owner’s manual. It lists the recommended oil viscosity and type for your specific engine. You can also look for a sticker under the hood that shows the oil specifications. When in doubt, ask a parts store associate for help.
Is It Safe to Change Oil Without a Lift?
Yes, you can change oil without a lift. A basic jack and jack stands work perfectly fine. Just make sure the car is on a flat surface and the jack stands are secure. Never work under a vehicle supported only by a jack.
How Long Does It Take to Change Car Oil for the First Time?
Your first oil change will take about 30 to 45 minutes. As you gain experience, you can do it in 20 to 30 minutes. The key is to take your time and follow each step carefully. Speed will come with practice.