The Correct Pattern When Bleeding a Brake System With ABS
Bleeding a brake system with ABS requires a specific sequence and the right tools to remove air from the hydraulic lines and ABS module. Whether you are a DIY mechanic or a curious car owner, this guide walks you through the entire process in simple, clear steps. You will learn the correct bleeding order, the best methods for ABS-equipped vehicles, and common mistakes to avoid.
Your car stops because of a complex system of hydraulics, valves, and sensors working together. When you press the brake pedal, brake fluid pushes through lines to each wheel. That pressure activates the calipers, which squeeze the rotors and slow your vehicle down.
But here is the thing. Air can get inside those lines. And air compresses. Unlike brake fluid, air does not transmit force consistently. That means a spongy pedal, reduced stopping power, or even a complete brake failure. For vehicles equipped with Anti-lock Braking Systems, the problem gets even more complicated.
So what is the correct pattern when bleeding a brake system with ABS? It is not the same as bleeding a standard hydraulic brake system. You need to follow a specific sequence, use the right tools, and pay extra attention to the ABS module. In this guide, we break it all down into simple, actionable steps you can follow with confidence.
Key Takeaways
- Correct Sequence Matters: Always start with the wheel farthest from the master cylinder and work your way closer.
- ABS Module Requires Special Attention: The ABS pump and modulator need a dedicated bleeding step using a scan tool or specific procedure.
- Use the Right Brake Fluid: Match your fluid type to your vehicle specifications to avoid damaging the ABS system.
- Multiple Methods Exist: Pressure bleeding, vacuum bleeding, and manual gravity bleeding all have their place depending on your setup.
- Never Skip the Brake Fluid Flush: Old, contaminated fluid causes ABS malfunctions and reduces braking performance.
- Safety First: Always test your brakes in a safe area before driving on public roads after bleeding.
📑 Table of Contents
Why ABS Systems Change the Bleeding Process
Traditional brake systems are relatively straightforward. You have a master cylinder, brake lines, calipers or wheel cylinders, and fluid. Bleeding them follows a simple path from farthest to nearest.
ABS systems add a layer of complexity. Your vehicle has an ABS pump, also called an ABS modulator, that sits between the master cylinder and the wheels. This pump contains valves that rapidly pulse pressure to prevent wheel lockup during hard braking. Inside the ABS module, there are accumulators and chambers that hold brake fluid under pressure.
When air enters the ABS module, it gets trapped in these small chambers. A standard bleeding routine will not remove that air. You need a dedicated ABS bleeding procedure. This usually involves using a diagnostic scan tool to cycle the ABS pump and push fluid through the modulator. Skipping this step leaves hidden air pockets that cause ABS malfunctions and an inconsistent brake pedal feel.
How the ABS Module Works During Braking
When you slam on the brakes, wheel speed sensors detect if a wheel is about to lock. The ABS control module then signals the pump to reduce pressure at that specific wheel. It pulses the pressure multiple times per second. This rapid cycling is what gives you that vibrating feeling through the pedal during a hard stop.
For the system to work correctly, every single channel inside the ABS module must be completely free of air. Even a tiny bubble can disrupt the pressure pulses. That is why the bleeding pattern matters so much. You must clear the main lines first and then address the ABS module separately.
Tools You Will Need
Before you start, gather everything you need. Having the right tools makes the job faster, safer, and more effective.
- Brake fluid: Use the type specified in your owner manual. Most modern vehicles use DOT 3 or DOT 4 fluid. Never mix different types.
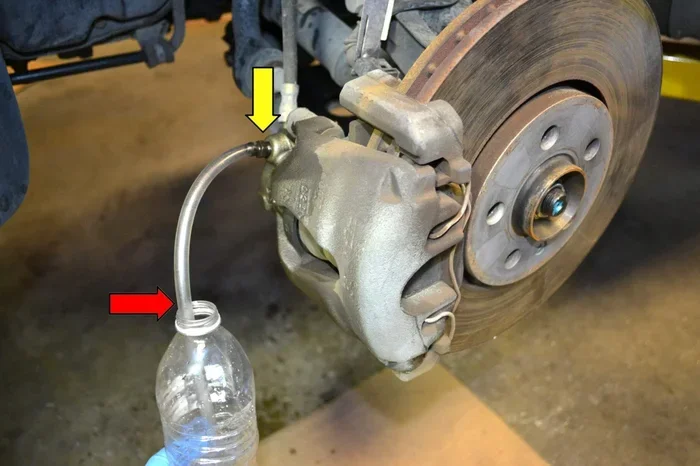
- Clear bleeding hose: This fits over the bleeder valve and directs fluid into a container.
- Wrench set: The correct size for your bleeder valves. A 10mm or 8mm wrench is common for most cars.
- Diagnostic scan tool: An ABS-capable scan tool is essential for cycling the ABS pump on most modern vehicles.
- Brake bleeder tool or pressure bleeder: A pressure bleeder pressurizes the reservoir and forces fluid through the system. This saves significant time.
- Clean rags and gloves: Brake fluid damages paint. Keep rags handy and wear gloves to protect your hands.
- Jack and jack stands: You need safe access to all four wheels.
- Brake fluid catch bottle: A container to collect old fluid as you bleed each line.
Why a Scan Tool Is Non-Negotiable
You cannot properly bleed an ABS system without a scan tool that supports ABS bleeding procedures. The scan tool activates the ABS pump and opens internal valves in the modulator. This pushes fluid and any trapped air out of the system. Without this step, you risk leaving air inside the ABS module, which leads to ABS warning lights, erratic braking, and potential safety hazards.
The Correct Bleeding Sequence for ABS Systems
This is the most important part of the entire process. The sequence you follow determines whether you remove all the air or leave dangerous pockets behind. Always start at the wheel farthest from the master cylinder and work toward the closest.
Standard Bleeding Order
For most vehicles, the correct bleeding order is:
- Right rear wheel (farthest from the master cylinder)
- Left rear wheel
- Right front wheel
- Left front wheel
This order ensures that air bubbles travel toward the master cylinder and out through the bleeder valve. If you bleed a closer wheel first, air from farther wheels can push back into lines you already cleared.
ABS-Specific Bleeding Steps
After you complete the standard four-wheel bleed, you must perform the ABS-specific procedure. Here is how it works:
Step 1: Connect your scan tool to the OBD-II port under the dashboard.
Step 2: Navigate to the ABS or brake system menu.
Step 3: Select the active bleed or pump cycle function.
Step 4: Follow the on-screen prompts. The scan tool will command the ABS pump to cycle through its valves.
Step 5: Watch for fluid flowing through the clear hose. Look for bubbles. Continue until the fluid runs clear and bubble-free.
Step 6: Repeat for the ABS pump cycle as many times as the scan tool instructs.
Some vehicles require you to bleed the ABS module before the wheels. Others require it after. Always check your vehicle-specific service manual. The order can vary significantly between manufacturers.
When to Bleed the ABS Module First
In certain vehicles, particularly those with integrated ABS and stability control systems, you should bleed the ABS module first. This is common in European brands like BMW, Mercedes-Benz, and Audi. The procedure typically involves using the scan tool to initiate a pump cycle while fluid flows through the module before touching the wheel bleeders.
If you are unsure, consult a repair database or your vehicle service manual. Doing the wrong order can mean you bleed the wheels multiple times without clearing the air from the ABS module.
Bleeding Methods Compared
There are several ways to bleed brake systems. Each method has advantages and limitations. Here is how they stack up for ABS-equipped vehicles.
| Method | Best For | ABS Compatible | Difficulty | Time Required |
|---|---|---|---|---|
| Manual Gravity Bleeding | Simple setups, DIY beginners | Partial (requires scan tool for ABS module) | Easy | 45-90 minutes |
| Pressure Bleeding | Full system flush, speed | Yes (with scan tool for ABS module) | Medium | 30-60 minutes |
| Vacuum Bleeding | Quick wheel bleeds | Partial (scan tool still needed) | Easy | 30-60 minutes |
| Scan Tool Active Bleed | ABS module purging | Yes (required for ABS) | Advanced | 15-30 minutes |
| Two-Person Manual Bleed | No special tools available | Partial (scan tool still needed) | Medium | 45-90 minutes |
Why Pressure Bleeding Saves Time
A pressure bleeder attaches to the brake fluid reservoir and maintains constant pressure. Fresh fluid is pushed through the entire system, pushing out old fluid and air. This method is excellent for a full brake fluid flush. However, you still need the scan tool to bleed the ABS module. Pressure bleeding alone will not clear air from inside the ABS pump.
The Two-Person Method
This is the classic approach. One person pumps the brake pedal three to five times and holds it down. The second person opens the bleeder valve, lets fluid and air escape, then closes the valve before the pedal is released. Repeat until no bubbles appear. This method works well for the standard wheel bleeds but still requires the scan tool for the ABS module.
Common Mistakes When Bleeding ABS Brake Systems
Even experienced DIYers make mistakes. Avoiding these common errors saves you time, money, and frustration.
Skipping the ABS Module Bleed
This is the number one mistake. People bleed all four wheels perfectly and think the job is done. But the ABS module still contains air. The result is an ABS warning light on the dashboard, erratic ABS behavior, or a brake pedal that feels normal at low speeds but sinks to the floor during hard stops.
Using the Wrong Brake Fluid
Not all brake fluids are the same. DOT 3, DOT 4, and DOT 5 fluids have different chemical compositions and boiling points. Using the wrong fluid can damage the ABS pump seals and cause the system to fail. Always check your owner manual for the correct specification.
Letting the Reservoir Run Dry
As you bleed each wheel, the master cylinder reservoir loses fluid. If it runs dry, you introduce more air into the system. Keep the reservoir topped off throughout the entire process. Check it before every wheel bleed.
Bleeding in the Wrong Order
Bleeding a closer wheel first can push air into lines you already cleared. Always follow the correct sequence from farthest to nearest. This simple rule prevents a lot of rework.
Not Cycling the ABS Pump Enough Times
One scan tool cycle is rarely enough. The ABS module has multiple chambers and accumulators. You often need to run the pump cycle two or three times to fully purge the system. Watch the fluid carefully and keep bleeding until it is completely bubble-free.
Forgetting to Check for Leaks
Air in the system is often caused by a leak somewhere. Before you bleed, inspect all brake lines, fittings, and caliper seals. A small leak will reintroduce air no matter how many times you bleed the system.
Step-by-Step Bleeding Procedure
Now that you understand the theory, here is the full step-by-step process. Follow these instructions carefully for a successful bleed.
Step 1: Prepare the Vehicle
Park on a flat surface. Engage the parking brake. Lift the vehicle using a jack and secure it on jack stands. Remove the wheels to access the bleeder valves.
Step 2: Inspect the Brake Fluid Reservoir
Open the hood and locate the brake fluid reservoir. Check the fluid level and condition. If the fluid is dark brown or black, perform a full flush instead of a bleed. Clean the reservoir cap area to prevent dirt from entering the system.
Step 3: Connect the Bleeder Hose
Attach the clear bleeding hose to the first bleeder valve. Place the other end of the hose into a catch bottle partially filled with fresh brake fluid. This prevents air from being sucked back into the line when you release the valve.
Step 4: Start the Bleeding Process
Have your assistant pump the brake pedal slowly three to five times. They should hold the pedal down firmly. Open the bleeder valve one-quarter turn. Fluid and air will flow through the hose. Close the valve before your assistant releases the pedal. Repeat until the fluid runs clear with no bubbles.
Step 5: Move to the Next Wheel
Follow the correct sequence. Top off the reservoir before moving to the next wheel. Do not let it run dry.
Step 6: Perform the ABS Scan Tool Procedure
Once all four wheels are bled, connect the scan tool. Initiate the ABS pump cycle. Watch for fluid movement and bubbles in the clear hose. Run the cycle as many times as needed until the fluid is completely clear.
Step 7: Top Off and Test
Fill the master cylinder reservoir to the correct level. Replace the cap. Start the engine and press the brake pedal. The pedal should feel firm and solid. If it feels spongy, repeat the bleeding process on the affected wheel. Finally, take the vehicle to a safe, empty area and test the brakes at low speed.
Quick Tips for a Successful Bleed
- Keep the brake fluid reservoir topped off at all times.
- Use fresh, sealed brake fluid. Old fluid absorbs moisture and performs poorly.
- Work in a shaded area if possible. Brake fluid is hygroscopic and degrades quickly when exposed to air and moisture.
- Tighten bleeders to the correct torque. Over-tightening can crack the valve or fitting.
- Replace bleeder valve caps after each wheel to prevent contamination.
- Take photos at each step so you can reference them if something goes wrong.
When to Seek Professional Help
Bleeding a brake system with ABS is a task many DIYers can handle. But there are situations where professional help is the smart choice.
If your ABS warning light stays on after bleeding, there may be a deeper issue. The wheel speed sensors could be faulty, the ABS pump motor might have failed, or there could be a wiring problem in the ABS circuit. These are not problems that a simple bleed will fix.
Similarly, if you have tried multiple bleeding attempts and still get a spongy pedal, you may have a leak in a brake line or a failing caliper seal. These issues require professional diagnosis and repair.
There is no shame in calling a mechanic. Brake work is safety-critical. If you are unsure about any step, a qualified technician can complete the job quickly and correctly.
Conclusion
Bleeding a brake system with ABS is more involved than a standard brake bleed, but it is absolutely doable with the right knowledge and tools. The key is understanding that the ABS module requires its own dedicated bleeding procedure using a scan tool. Follow the correct sequence from farthest to nearest wheel, and never skip the ABS pump cycle.
Use the right brake fluid, keep the reservoir topped off, and take your time. Rushing through the job leads to missed air pockets and potential safety issues. When in doubt, consult your vehicle service manual or seek professional assistance.
A properly bled ABS brake system gives you confident stopping power and peace of mind. Every time you press the brake pedal, you can trust that your vehicle will respond exactly as it should. That is the real reward for doing this job right.
Frequently Asked Questions
Can I bleed the ABS system without a scan tool?
In most modern vehicles, the answer is no. The ABS module has internal chambers and accumulators that require the pump to be cycled electronically. A scan tool activates this pump cycle and opens internal valves to purge trapped air. Without it, you risk leaving air inside the ABS system, which causes warning lights and erratic braking behavior.
How do I know if air is still in my ABS system?
The most common signs are a spongy or sinking brake pedal, an ABS warning light on the dashboard, and unusual pulsing or vibration during normal braking. If you notice any of these symptoms after bleeding, you likely still have air in the system. Repeat the bleeding process, paying special attention to the ABS module purge cycle.
How often should I bleed my brake system?
Most manufacturers recommend a full brake fluid flush every two years or 30,000 miles, whichever comes first. You should also bleed the system any time you open a brake line, replace a caliper, or notice spongy pedal feel. Regular fluid changes prevent moisture buildup that can damage the ABS pump and reduce braking performance.
What happens if I use the wrong brake fluid?
Using the wrong brake fluid can cause serious damage to the ABS system. Different DOT fluids have different chemical properties, and mixing them can lead to seal degradation, reduced boiling points, and ABS pump failure. Always use the fluid type specified in your owner manual. If you accidentally mix fluids, flush the entire system immediately.
Is it safe to drive after bleeding the brakes?
Only after you have thoroughly tested the brake pedal feel and confirmed there are no warning lights. Start by pressing the pedal with the engine off. It should feel firm and hold pressure. Then start the engine and press the pedal again. It should drop slightly and then firm up. Finally, test in a safe, empty area at low speed before driving on public roads.
Can I bleed just one wheel instead of all four?
You can bleed a single wheel if you have only opened one bleeder valve. However, if you have opened any part of the brake system, it is best practice to bleed all four wheels. Air can migrate through interconnected lines, and a partial bleed often leaves hidden pockets that cause problems later. For ABS systems, always perform the full procedure including the ABS module purge.