Can You Replace Just One U-Joint Without Replacing Both
Replacing just one U-joint is possible in some cases, but it depends on the condition of the other joint and your vehicle type. Most mechanics recommend replacing both U-joints at the same time to prevent future breakdowns and save money on labor. This guide covers everything you need to know about U-joint replacement, including symptoms, costs, and step-by-step tips.
If you have ever heard a loud clunk when shifting gears or felt a strange vibration at highway speeds, your U-joint might be crying for help. The universal joint is a small but mighty part of your vehicle’s drivetrain. It connects your driveshaft to the transmission and rear axle, allowing power to flow smoothly while your suspension moves up and down.
When a U-joint starts to wear out, you face a big question: can you replace just one, or do you need to swap them both? This is a common debate among car owners and DIY mechanics alike. Some say replacing both is a waste of money, while others insist it is the only smart move.
In this article, we will break down the answer in plain English. You will learn when single replacement makes sense, when you should replace both, and how to spot the early warning signs of a bad U-joint. We will also walk you through the cost, the replacement process, and expert tips to keep your drivetrain running strong.
Key Takeaways
- You can replace one U-joint: If the other joint is in good shape, single replacement is sometimes an option.
- Replacing both is usually recommended: Paired U-joints wear together, so replacing both prevents repeat repairs.
- Watch for warning signs: Vibrations, clunking noises, and grease leaks signal a failing universal joint.
- Cost varies widely: DIY replacement can cost under $50, while professional repair may run $200 to $500.
- Drivetrain health matters: A worn U-joint can damage your driveshaft, carrier bearing, and slip yoke over time.
- Regular maintenance helps: Greasing your U-joints extends their lifespan and prevents premature failure.
- Know your vehicle type: Rear-wheel drive trucks and SUVs rely heavily on U-joints, making this repair more common.
📑 Table of Contents
- What Is a U-Joint and Why Does It Matter?
- Can You Replace Just One U-Joint? The Full Answer
- When Should You Replace Both U-Joints?
- Warning Signs Your U-Joint Is Failing
- How to Replace a U-Joint Yourself
- U-Joint Replacement Cost and Budget Tips
- Expert Tips for U-Joint Maintenance and Longevity
- Common Mistakes People Make With U-Joint Replacement
- Conclusion
What Is a U-Joint and Why Does It Matter?
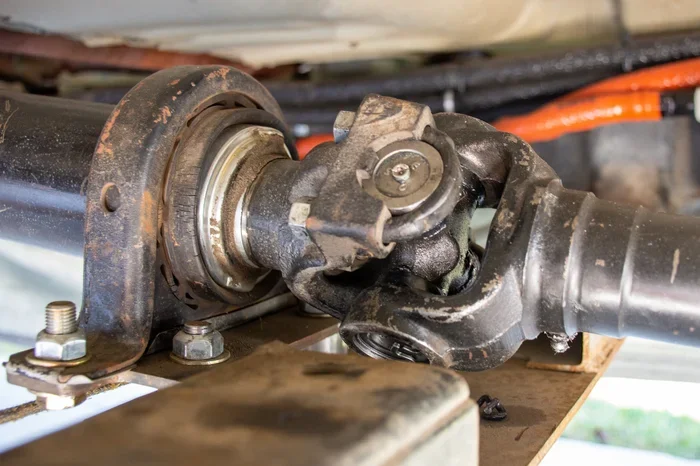
A U-joint, short for universal joint, is a flexible coupling that transfers rotational power between two shafts that are not perfectly aligned. Think of it as a hinge that lets your driveshaft bend and move with your suspension. Without it, your wheels would not be able to absorb bumps and dips on the road.
Most rear-wheel drive vehicles have two U-joints: one near the transmission and one near the rear axle. These joints work as a pair, sharing the load and keeping your driveshaft spinning smoothly. Over time, the needle bearings inside each joint wear down, causing play, looseness, and eventually failure.
Your drivetrain depends on healthy U-joints to transfer torque efficiently. When they go bad, you lose power, feel vibrations, and risk damaging other expensive parts like the slip yoke and carrier bearing. That is why paying attention to U-joint symptoms early can save you a lot of money and headache.
How U-Joints Work in Your Drivetrain
The driveshaft spins between the transmission output shaft and the rear axle pinion shaft. The U-joints at each end allow for slight angle changes as the suspension compresses and extends. Inside each joint, you will find a cross-shaped center piece called a spider, held in place by bearing caps. These bearing caps contain needle bearings that let the joint rotate freely with very little friction.
When grease flows through the grease fitting, it keeps the needle bearings lubricated and cool. If the grease dries up or the seals crack, the bearings wear out fast. This is one of the most common causes of U-joint failure, especially in trucks and SUVs that see heavy use or tow a lot of weight.
Can You Replace Just One U-Joint? The Full Answer
The short answer is yes, you can replace just one U-joint in many cases. However, the better question is whether you should. The answer depends on several factors, including the age and condition of the other joint, your driving habits, and your vehicle type.
In a rear-wheel drive truck or SUV, both U-joints on the driveshaft experience similar wear because they spin at the same speed and carry similar loads. If one joint has failed from age or use, the other one is usually not far behind. This is why many experienced mechanics recommend replacing both at the same time.
That said, there are situations where replacing only one makes perfect sense. If your vehicle has low mileage, the other joint is brand new, or the failure was caused by a specific event like a sudden impact or a bad grease fitting, then single replacement is a valid choice. Let us look at both scenarios more closely.
When Single U-Joint Replacement Works
Single replacement works well when the other U-joint is in great shape. Here are a few situations where this approach makes sense:
- Low vehicle mileage: If your truck has only 40,000 miles and one joint fails from a manufacturing defect, the other joint likely has plenty of life left.
- Recent replacement of the other joint: If you or a mechanic just replaced both joints a year ago, and one fails early, replacing just the bad one saves you money.
- One joint damaged by external factors: A rock, road debris, or an accident can damage a single U-joint without affecting the other.
- Tight budget constraints: Sometimes you just need to get back on the road safely, and single replacement gets the job done for less.
When You Should Definitely Replace Both
Replacing both U-joints is the safer and more cost-effective choice in the long run. Here is why:
- They wear as a pair: Both joints on a driveshaft experience the same RPM and load. If one is worn, the other will likely follow soon.
- Labor cost is similar: Whether you replace one or both, the disassembly and reassembly steps are nearly the same. Adding the second joint costs you only the part, not the labor.
- It prevents repeat repairs: Coming back for a second U-joint replacement means paying labor again and risking being stranded if the second joint fails in the meantime.
- It protects your driveshaft: A worn U-joint puts extra stress on the driveshaft tube, yokes, and splines. Replacing both keeps the entire drivetrain healthy.
When Should You Replace Both U-Joints?
Most professionals agree that replacing both U-joints at the same time is the best practice. This is especially true for trucks, vans, and SUVs with higher mileage. If your vehicle has over 80,000 miles and one U-joint shows wear, the chances are good that the other one is right behind it.
The logic is simple: U-joints are designed to work as a matched pair. They are engineered to handle the same speeds, angles, and loads. When one starts to fail, the other one is absorbing the extra stress that the bad joint can no longer handle. This accelerates wear on the healthy joint and can lead to a second failure much sooner than expected.
If you are doing the work yourself, replacing both joints adds very little time. The driveshaft has to come out either way. Once it is off, you have full access to both joints. It just makes sense to swap them both while you are in there.
The “Mating” Concept in U-Joint Replacement
Experienced drivetrain specialists use the term “mating” when they talk about U-joint replacement. This means installing a new joint on each end of the driveshaft as a matched set. The reason is that even a slightly worn joint can cause the new one to wear faster. The mismatched speeds and angles create uneven stress on the needle bearings.
Think of it like replacing only one tire on your car. If the other three tires have deep tread, the new tire will wear out much faster because it has to work harder to keep up. The same principle applies to your driveshaft and its U-joints.
Some people argue that this only matters for high-performance or heavy-duty applications. But in reality, any vehicle that drives regularly benefits from the mating approach. It is a small extra cost that pays off in reliability and peace of mind.
Warning Signs Your U-Joint Is Failing
Catching a bad U-joint early can save you from a much bigger repair bill. The symptoms are usually hard to ignore once they start. Here are the most common signs that your universal joint needs attention.
Vibration at Highway Speeds
This is the number one symptom of a worn U-joint. You will feel a rhythmic vibration that gets worse as you speed up, usually between 40 and 65 mph. The vibration often comes from underneath the vehicle and may feel like it is coming through the floorboard or the steering wheel.
Unlike tire balance issues, U-joint vibrations tend to get worse under load. If you feel it more when towing or carrying heavy cargo, that is a strong clue the U-joint is the culprit.
Clunking or Clicking Noises
A loud clunk when you shift from drive to reverse is a classic sign of a loose U-joint. The excess play in the joint allows the driveshaft to knock against other components. You might also hear a clicking sound when turning or going over bumps.
These noises mean the needle bearings inside the joint are worn and no longer holding the cross and bearing caps tightly together. Ignoring this sound can lead to a complete joint failure and a broken driveshaft.
Grease Leaks Around the Joint
U-joints have grease fittings and seals to keep lubricant inside. When these seals crack or dry out, grease leaks out and dirt gets in. If you see a dark, greasy mess around the base of the driveshaft near the U-joint, the joint is likely exposed to contamination and wear.
Difficulty Shifting Gears
A worn U-joint can cause the driveshaft to move slightly out of alignment, which affects the transmission’s ability to engage gears smoothly. You might notice rough shifting or a slight delay when putting the vehicle in gear.
How to Replace a U-Joint Yourself
If you are a DIY enthusiast, replacing a U-joint is a very doable weekend project. You do not need a garage full of expensive tools, just the right ones and a little patience. Here is a simplified overview of the process.
Tools You Will Need
- Socket set and wrenches
- U-joint puller tool
- Press or vise for pressing out the old joint
- New U-joint(s) and replacement bearing caps
- Needle bearing kit
- High-temp grease and a grease gun
- Penetrating oil like PB Blaster
Step-by-Step Process
- Secure the vehicle: Jack it up and support it on jack stands. Make sure the wheels are chocked and the transmission is in neutral.
- Mark the driveshaft position: Use a marker to note the alignment between the driveshaft and the slip yoke. This helps you reassemble everything in the same position, which reduces vibration.
- Remove the driveshaft: Unbolt the U-joint straps or bolts at both ends. Carefully slide the driveshaft out and set it aside.
- Remove the old U-joint: Use a U-joint puller or a press to push the bearing caps out of the cross. Apply penetrating oil if the caps are stuck.
- Install the new joint: Press the new bearing caps into the cross. Make sure the needle bearings are properly seated in the caps and the cross grooves.
- Grease the new joint: Pump grease through the fitting until you see fresh grease coming out of the other side. This pushes out air and fills the bearing cavities.
- Reinstall the driveshaft: Slide it back into position, align it with your marks, and bolt the straps or yokes securely.
- Test drive: Take a short test drive and listen for any unusual noises or vibrations. Check underneath for any leaks or loose connections.
Quick Tips for a Smooth Replacement
- Always clean the slip yoke and the transmission output shaft splines before reinstalling the driveshaft.
- Use a high-quality U-joint from a trusted brand like Spicer, Moog, or SKF.
- Replace the snap rings and retaining clips while you have the joint apart.
- If the driveshaft is bent or the yokes are damaged, consider having the driveshaft professionally repaired or replaced.
- Never reuse old needle bearings or bearing caps. They are cheap insurance against premature failure.
U-Joint Replacement Cost and Budget Tips
The cost of replacing a U-joint can vary quite a bit depending on your vehicle, where you live, and whether you do the work yourself. Let us break down the numbers so you can plan your budget.
Parts Cost
A single U-joint typically costs between $15 and $40 for a standard replacement. Premium brands or heavy-duty applications can run $50 to $80 per joint. If you replace both joints, you are looking at roughly double that parts cost.
Labor Cost
If you take your vehicle to a shop, labor charges for U-joint replacement usually range from $100 to $250. The actual work takes about one to two hours, but shops charge a flat rate that may be higher for certain vehicles, especially trucks with difficult access.
Total Cost Comparison
Here is a quick look at what you might expect to pay:
- DIY single replacement: $15 to $40 for the part. No labor cost.
- DIY both replacement: $30 to $80 for both parts. Still no labor cost.
- Shop single replacement: $115 to $290 total including parts and labor.
- Shop both replacement: $130 to $330 total. The extra part is a small addition compared to the labor savings.
As you can see, the labor cost stays the same whether you replace one or both joints. This makes replacing both the obvious value play for most vehicle owners.
How to Save Money on U-Joint Replacement
- Buy your U-joints online from reputable auto parts retailers instead of the dealership markup.
- Do the replacement yourself if you have basic mechanical skills and the right tools.
- Ask your mechanic to inspect the carrier bearing and slip yoke while the driveshaft is off. Catching these issues early prevents costly towing bills later.
- Keep up with regular drivetrain maintenance, including greasing your U-joints if they have grease fittings.
Expert Tips for U-Joint Maintenance and Longevity
Prevention is always cheaper than repair. Taking care of your U-joints can add years of life to your driveshaft and drivetrain. Here are some tips from experienced mechanics and drivetrain specialists.
Grease your U-joints regularly. If your vehicle has grease fittings on the U-joints, pump them with a quality grease every oil change or every 5,000 miles. Fresh grease keeps the needle bearings lubricated and washes away contaminants. Use a high-pressure lithium grease rated for U-joint applications.
Check your driveshaft alignment. If your vehicle has been lifted or modified, the drivetrain angles may have changed. Improper angles cause uneven wear on the U-joints and the carrier bearing. Have a drivetrain specialist check your angles if you have made suspension changes.
Inspect for play regularly. Grab the driveshaft at the rear and try to wiggle it up and down. Any noticeable play is a sign that the U-joint is worn. Do this inspection every few months, especially if you tow or haul heavy loads.
Replace seals at the same time. When you are replacing a U-joint, the seal around the slip yoke or the bearing cap seal may also need replacing. Fresh seals prevent grease leaks and keep dirt out of the joint.
Do not ignore small symptoms. A slight vibration or an occasional click today can become a broken driveshaft tomorrow. Addressing U-joint issues early keeps your repair simple and affordable.
Common Mistakes People Make With U-Joint Replacement
Even experienced DIYers can make mistakes when replacing U-joints. Here are a few to avoid:
- Forgetting to mark the driveshaft alignment: If you do not mark the position before removing the driveshaft, you may reinstall it with a slight phase difference. This causes vibrations even with a new U-joint installed.
- Reusing old bearing caps: The bearing caps wear in a specific pattern. Reusing them with a new cross can cause uneven wear and premature failure of the new joint.
- Over-greasing or under-greasing: Too much grease can push past the seals and attract dirt. Too little grease leaves the needle bearings dry and prone to rapid wear.
- Ignoring the carrier bearing: If your driveshaft has a carrier bearing, a worn U-joint puts extra stress on it. Always inspect the carrier bearing when replacing a U-joint.
- Using the wrong U-joint size: U-joints come in different sizes and series (such as 1310, 1350, 2130). Using the wrong size creates improper fitment and can be dangerous.
Conclusion
So, can you replace just one U-joint without replacing both? Yes, you can in many situations. But the smarter, more cost-effective choice in most cases is to replace both U-joints at the same time. They work as a pair, wear at a similar rate, and replacing both saves you from repeat labor costs and the risk of being stranded with a second failure.
Whether you choose single or double replacement, the key is to act quickly when you notice symptoms. A worn U-joint will not fix itself. It only gets worse over time, and the longer you wait, the more damage it can do to your driveshaft, transmission, and rear axle components.
Use this guide to make an informed decision about your U-joint replacement. Check for warning signs, understand the costs, and follow the maintenance tips to keep your drivetrain healthy for miles to come. Your wallet and your vehicle will thank you.
Frequently Asked Questions
How do I know if I need to replace one or both U-joints?
Inspect both U-joints by grabbing the driveshaft and checking for play. If the other joint shows any looseness or wear, replace both. If the other joint is tight and feels solid, single replacement may be sufficient. A mechanic can also do a quick inspection for you.
How long does a U-joint replacement take?
A DIY replacement takes about one to two hours for both joints. A professional shop usually takes one to two hours as well, since the driveshaft must be removed and reinstalled regardless of how many joints are replaced.
Can I drive with a bad U-joint?
You should not drive with a bad U-joint for long. A severely worn joint can cause the driveshaft to disconnect, which is dangerous and can damage the transmission and exhaust system. Get it replaced as soon as possible.
How much does it cost to replace a U-joint at a shop?
Expect to pay between $150 and $300 at a shop for a single U-joint replacement including parts and labor. Replacing both joints at the same time usually costs only slightly more because the labor is the same.
What causes a U-joint to wear out prematurely?
Common causes include lack of lubrication, worn seals that let dirt in, improper drivetrain angles after a lift or modification, heavy towing, and simple age and mileage. Regular greasing and inspection help prevent premature wear.
Is a U-joint replacement covered by vehicle warranty?
It depends on your warranty terms. Most factory warranties do not cover U-joints because they are considered wear items. However, if a U-joint fails due to a manufacturing defect, it may be covered. Check with your dealer or warranty provider for specific details.