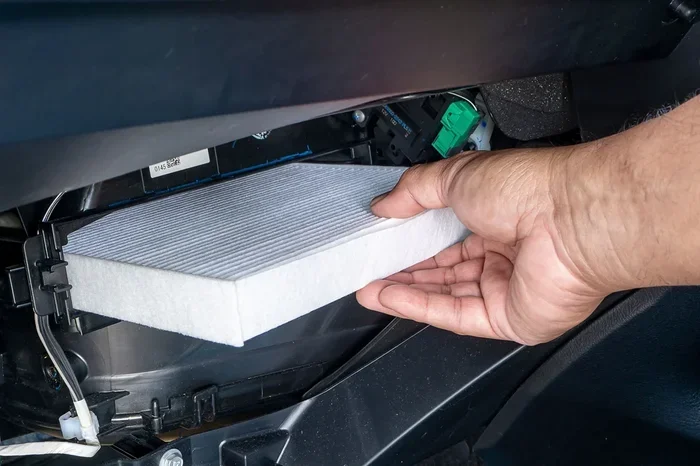
Are Cabin Air Filters Hard to Replace on Most Cars
Are cabin air filters hard to replace? The short answer is no. Most cars make it surprisingly easy to swap out your cabin air filter in under 15 minutes. You do not need special tools or mechanic skills. This guide walks you through everything you need to know about cabin air filter replacement with confidence.
Have you ever wondered whether changing the air filter inside your car is something you can handle on your own? The question are cabin air filters hard to replace comes up often among car owners. Many people assume it requires a trip to the mechanic or expensive tools. The truth is far simpler than most drivers think.
Your car’s cabin air filter plays a big role in the air quality inside your vehicle. It catches dust, pollen, mold spores, and other particles before they reach your lungs. Over time, this filter gets clogged and stops working well. Replacing it regularly keeps your car interior fresh and your family breathing cleaner air.
The good news is that cabin air filter replacement is one of the easiest maintenance tasks you can do. Most vehicles are designed with easy access to the filter. Whether you are a complete beginner or a seasoned DIYer, you can handle this job in your driveway or garage. Let us walk through everything you need to know.
Key Takeaways
- Easy DIY Task: Replacing a cabin air filter is one of the simplest maintenance jobs you can do at home.
- No Special Tools Needed: Most cars only require a screwdriver or no tools at all.
- Location Varies by Car: The filter is usually behind the glove box or under the hood, but placement differs by model.
- Signs of a Dirty Filter: Reduced airflow, musty smells, and increased allergy symptoms inside the car signal a dirty filter.
- Cost Savings: Doing it yourself saves money compared to paying a mechanic for a quick 10-minute job.
- Regular Replacement Matters: Changing the filter every 12,000 to 15,000 miles keeps your car air clean and your HVAC system healthy.
📑 Table of Contents
- What Is a Cabin Air Filter and Why Does It Matter?
- Where Is the Cabin Air Filter Located?
- Step-by-Step Guide to Replacing Your Cabin Air Filter
- Common Mistakes People Make When Replacing Cabin Air Filters
- How Often Should You Replace Your Cabin Air Filter?
- Signs Your Cabin Air Filter Needs Replacement
- Cabin Air Filter Types and Which One to Choose
- Can You Save Money by DIY Replacement?
- Expert Insights on Cabin Air Filter Maintenance
- Conclusion
What Is a Cabin Air Filter and Why Does It Matter?
A cabin air filter is a small filtration device inside your car. It cleans the air that flows through your heating, ventilation, and air conditioning system. When you turn on the fan or the AC, air passes through this filter first. It traps dirt, pollen, bacteria, and even exhaust fumes before the air reaches you.
Not every car has one. Older vehicles sometimes skip this feature entirely. But most cars built after 2000 come standard with a cabin air filter. If you are not sure whether your car has one, check your owner’s manual. It will tell you exactly where the filter sits and how to access it.
How the Cabin Air Filter Protects You
The air inside your car can be up to five times more polluted than the air outside. This sounds surprising, but it is true. Your car air filter works hard to keep that pollution out of the cabin. Without a functioning filter, you breathe in all kinds of harmful particles every time you drive.
For people with allergies or asthma, a clean pollen filter makes a huge difference. It reduces sneezing, coughing, and watery eyes during allergy season. It also helps eliminate musty smell car issues that come from a clogged filter. Keeping your filter fresh is one of the simplest ways to improve your daily driving comfort.
Where Is the Cabin Air Filter Located?
The location of your cabin air filter location depends on your car’s make and model. Most manufacturers place it in one of two spots. Understanding where it lives helps you figure out whether the replacement job will be easy or a bit more involved.
Behind the Glove Box
This is the most common spot in modern cars. In many vehicles, you simply pull down the glove box, remove a few clips, and the filter slides right out. The access panel is usually very straightforward. You do not need to crawl under the dashboard or remove any major components.
Under the Hood Near the Firewall
Some cars, especially certain BMWs, Toyotas, and Fords, place the filter under the hood. It sits near the base of the windshield on the passenger side. This location is still accessible, but it may require you to open the hood and look around a bit. It is not difficult, but it takes a moment to find the right spot.
Under the Dashboard
A few vehicles hide the filter deep under the dashboard. This makes access a bit trickier. You might need to remove a plastic cover or work around some cables. Even in these cases, the replacement is still manageable with basic tools and a little patience.
Step-by-Step Guide to Replacing Your Cabin Air Filter
Wondering how to actually do it? The process is straightforward for most cars. Here is a simple walkthrough that applies to the majority of vehicles.
Step 1: Find Your Filter
Open your owner’s manual and look up the cabin air filter location. Some manuals include a diagram that shows exactly where it sits. If you do not have the manual, a quick online search for your car model and year will show you the spot.
Step 2: Gather Your Tools
You likely already have everything you need. Most replacements require nothing more than:
- A Phillips or flathead screwdriver
- A pair of gloves (optional but helpful)
- The new replacement filter
- A flashlight for better visibility
That is it. No special equipment. No mechanic visit needed. This is what makes replace cabin filter jobs so beginner-friendly.
Step 3: Remove the Old Filter
Open the access panel and carefully pull out the old filter. Pay attention to which direction the airflow arrow points. The arrow should face toward the HVAC unit. Note this orientation so you install the new filter the same way.
Dispose of the old filter properly. It will likely be covered in dust and debris. Shake it out gently before throwing it away.
Step 4: Insert the New Filter
Take your new cabin air filter and slide it into the housing. Make sure the airflow arrow points in the correct direction. Push it in firmly but gently. You do not want to force it or bend the filter frame.
Step 5: Close Everything Up
Replace the access panel or put the glove box back in place. Make sure all clips and screws are secure. Turn on your car and set the fan to high. Check that the airflow feels strong and even. If it does, you did it right.
Common Mistakes People Make When Replacing Cabin Air Filters
Even though this is a simple job, people make mistakes that cause problems. Avoiding these errors saves you time and keeps your HVAC system car running smoothly.
Installing the Filter Backwards
This is the most common mistake. Every cabin air filter has an airflow direction arrow. If you install it backwards, it restricts airflow instead of improving it. Your fan might feel weaker, and the filter will not trap particles effectively. Always double-check the arrow before sliding the filter in.
Forgetting to Replace the Filter
Some car owners open the housing, see the old filter, and then close it back up without putting in a new one. This sounds silly, but it happens more often than you would think. Set the new filter next to your workspace before you remove the old one. That way, you do not forget.
Using the Wrong Filter Size
Not all cabin air filters fit every car. Using the wrong size means gaps around the edges. Unfiltered air sneaks through those gaps and bypasses the filter entirely. Always check your car’s year, make, and model before ordering a replacement.
Ignoring the Housing and Seals
While you have the housing open, take a moment to inspect it. Look for cracks, loose seals, or debris inside the housing. A damaged housing lets unfiltered air into your car. Cleaning the housing before installing the new filter ensures a proper seal.
How Often Should You Replace Your Cabin Air Filter?
Most manufacturers recommend replacing the cabin air filter every 12,000 to 15,000 miles. However, this is just a general guideline. Your driving conditions play a big role in how fast the filter gets dirty.
If you drive on dirt roads frequently, the filter clogs faster. Living in a dusty or high-pollen area also shortens the filter’s lifespan. City driving with lots of stop-and-go traffic exposes the filter to more exhaust particles. In these cases, you might need to replace it every 10,000 miles or even sooner.
A good rule of thumb is to check the filter during every oil change. Most quick-lube shops will inspect it for free. If the filter looks dark and clogged, go ahead and swap it out. Catching a dirty filter early prevents airflow problems and keeps your air quality inside car at a healthy level.
Quick Tips for Filter Replacement Timing
- Check the filter at the start of allergy season
- Replace it before long road trips
- Keep a spare filter in your garage for quick swaps
- Set a reminder in your phone every 12 months
Signs Your Cabin Air Filter Needs Replacement
Your car gives you clear signals when the cabin air filter is overdue for a change. Learning to spot these signs early saves you from uncomfortable driving conditions.
Reduced Airflow From the Vents
This is the first and most obvious sign. When the filter gets clogged with dust and debris, it restricts airflow. The vents push out weaker air, even on the highest fan setting. You might notice this most when running the AC on a hot day. If your air vents clogged feeling persists, the filter is likely the culprit.
Unusual Smells Inside the Car
A musty smell car owners often notice points to a dirty filter. Mold and mildew build up in a saturated filter and get blown into the cabin. The smell is musty and persistent. It does not go away with air fresheners. Replacing the filter usually eliminates the odor completely.
Increased Allergy Symptoms
If you or your passengers start sneezing more inside the car, the filter might be failing. A dirty cabin air filter lets pollen, dust, and other allergens pass through unchecked. This is especially problematic during spring and fall allergy seasons. A fresh filter provides noticeable allergy relief car owners appreciate immediately.
Strange Noises From the HVAC System
A clogged filter makes the blower motor work harder. This can cause whistling or rattling sounds from the vents. If you hear unusual noises when the fan is running, check the filter first. It is the cheapest and easiest thing to fix.
Cabin Air Filter Types and Which One to Choose
Not all cabin air filters are created equal. The type you choose affects filtration performance, longevity, and cost. Understanding the options helps you make the best choice for your needs.
Standard Particulate Filters
These are the most common and affordable type. They trap dust, pollen, and larger particles effectively. Most cars come with standard filters from the factory. They work well for everyday driving and are easy to find at auto parts stores.
Activated Carbon Filters
These filters add a layer of activated carbon to the standard particulate material. The carbon absorbs odors, exhaust gases, and volatile organic compounds. If you drive in heavy traffic or near industrial areas, activated carbon filters offer superior air quality inside car protection. They cost a bit more but provide noticeably fresher air.
HEPA Cabin Filters
HEPA stands for High-Efficiency Particulate Air. These filters capture extremely small particles, including bacteria and fine dust. They are the gold standard for air conditioning filter performance. HEPA filters cost more than standard options, but they are worth it for allergy sufferers and those who prioritize clean air.
Comparison Table
| Filter Type | Pollen/Dust | Odors | Fine Particles | Cost |
|---|---|---|---|---|
| Standard Particulate | Good | Poor | Moderate | $ |
| Activated Carbon | Good | Excellent | Moderate | $$ |
| HEPA | Excellent | Good | Excellent | $$$ |
Which Filter Should You Pick?
For most drivers, a standard cabin air filter works perfectly fine. If you live in a city with heavy pollution, consider an activated carbon filter. If allergies are a major concern in your household, invest in a HEPA option. Whatever you choose, make sure it matches your car’s specifications. Check your owner’s manual or ask an auto parts store associate for the right fit.
Can You Save Money by DIY Replacement?
One of the biggest advantages of handling cabin air filter replacement yourself is the cost savings. A mechanic might charge you anywhere from $20 to $75 for the job. That includes the filter cost and labor. The filter itself typically costs between $10 and $30.
When you do it yourself, you pay only for the filter. That means you save 50% or more on every replacement. Over the life of your car, those savings add up quickly. If you replace the filter twice a year as recommended, you could save $100 or more over five years.
Beyond the money, there is the convenience factor. You do not need to schedule an appointment or wait at the shop. You can swap the filter on a Saturday morning while drinking your coffee. It is one of the most satisfying DIY car maintenance tasks you can do.
Expert Insights on Cabin Air Filter Maintenance
Automotive experts agree that most drivers overlook their cabin air filter for far too long. Many people do not even know it exists. A survey found that nearly 60% of car owners have never replaced their cabin filter. This is surprising given how simple and impactful the job is.
Mechanics recommend treating the cabin filter with the same importance as your engine air filter. Both play critical roles in protecting your vehicle and your health. The engine air filter vs cabin filter comparison is useful here. The engine filter cleans air going into the engine. The cabin filter cleans air going into the passenger area. Both need regular attention.
Some newer vehicles now include cabin air filter replacement indicators. These lights remind you when it is time for a change. If your car has this feature, pay attention to it. Even without an indicator, following the 12,000 to 15,000-mile guideline keeps everything running smoothly.
Quick Tips from the Pros
- Always carry gloves when handling old filters. They can be dirty and gritty.
- Take a photo of the old filter orientation before removing it. This helps with correct installation of the new one.
- Keep a small vacuum nearby to clean out debris from the filter housing.
- Replace the filter more often if you drive in dusty or high-traffic areas.
- Buy filters in bulk when you find a good brand and price. Stocking up saves trips to the store.
Conclusion
The answer to are cabin air filters hard to replace is a clear and resounding no. This is one of the easiest maintenance jobs you can tackle on your own. It takes just a few minutes, costs very little, and makes a noticeable difference in your driving experience. Clean air inside your car means fewer allergens, less dust, and no more musty smell car problems.
Whether you choose a standard filter, activated carbon, or HEPA option, the replacement process is the same. Find the filter, remove the old one, slide in the new one, and close it up. That is all there is to it. You do not need a mechanic, expensive tools, or specialized knowledge.
Make cabin air filter replacement a regular part of your car maintenance tips routine. Check it at every oil change and replace it at least once a year. Your lungs, your passengers, and your wallet will thank you. Take the time to do it yourself once, and you will never pay someone else to do it again.
Now that you know how simple this job really is, there is no excuse to keep putting it off. Grab a new filter, pop open your car’s access panel, and get it done today. You will be amazed at how easy it was and how much better your car feels afterward.
Frequently Asked Questions
How long does it take to replace a cabin air filter?
Most people complete the job in 5 to 15 minutes. If your car has easy access behind the glove box, it takes even less time. First-timers might take a few extra minutes while they get comfortable with the process.
What happens if you never replace your cabin air filter?
A neglected filter gets clogged with dust, pollen, and debris. This reduces airflow from your vents and makes your HVAC system work harder. Over time, it can cause musty odors, poor air quality, and even strain on your blower motor. Replacing it on schedule prevents all of these problems.
Can I wash and reuse my cabin air filter?
Most cabin air filters are not washable. They are made of paper or fiber material that degrades when wet. Reusing a dirty filter reduces filtration effectiveness. Always install a new filter for best results and clean air inside your car.
Is cabin air filter replacement covered under car warranty?
It depends on your warranty terms. Some extended warranties cover routine maintenance including filter replacement. Check with your warranty provider to see if cabin filter changes are included. In most cases, it is considered basic maintenance that falls on the owner.
Do electric vehicles have cabin air filters?
Yes, most electric vehicles use cabin air filters just like traditional cars. EVs rely on their HVAC system to manage cabin temperature, so a clean filter is essential. The replacement process is usually just as simple as in a gas-powered vehicle.
What is the difference between a cabin air filter and an engine air filter?
The cabin air filter cleans air entering the passenger compartment. The engine air filter cleans air going into the engine for combustion. They serve different purposes and are located in different spots. Both need regular replacement, but they are not interchangeable.
=== META DESCRIPTION ===
Find out if cabin air filters are hard to replace on most cars. Learn easy DIY steps, costs, and tips to keep your car air fresh and clean.